These look wheely good....is there a problem?

> 10 years ago
Reply
Register to post, see what you've read, and subscribe to topics.
colk2004
colk2004
317 posts
317 posts
21 Mar 2012 5:50pm
http://www.ebay.co.uk/itm/200729863019?ssPageName=STRK:MEWAX:IT&_trksid=p3984.m1423.l2649

I've been finding these more often on EBay more often and to me they look like a way of building up 26" wheels without TIG welding rims together. Also the price of these is cheaper than 2 steel rims per wheel[}:)] And these are a lot cheaper than the Surly rims that some are using. Also....why 26"? 24" downhill rims at 40mm width are also available and would mean I could swap from the motorbike wheels to grp wheels by flipping my spindle holders from the bottom to the top of the main axle (as designed).

Cheers Col
aus230
aus230
WA
1660 posts
WA, 1660 posts
21 Mar 2012 6:11pm
Are you talking about the rims without the spokes.
I am about to build a couple more wheels using similar rims 26"x 32mm wide. wish I had seen the 38mm, actually our wheels that we are currently building have all come from the local tips(aus230 landyacht and friend it Adelaide) the only cost uncured has been the resin and glass.
They are very easy to make. The details are all on seabrease. I think Paul was surprised how easy they where to make, and I think the result has been excellent in making a cheap strong 26"wheel.
Cheers
Vic

www.seabreeze.com.au/forums/Land-Yacht-Sailing/Construction/I-will-NOT-build-another-landyachtI-will-not/

www.seabreeze.com.au/forums/Land-Yacht-Sailing/Construction/Class-Five-Design/?page=5
colk2004
colk2004
317 posts
317 posts
21 Mar 2012 10:03pm
Yep. To use to build up some GRP wheels with. The chances of finding MTB rims at the tip is 0. So rather than buy 2 old ones and spend time grafting them together and paying about the same as these, this seems more sensible for me. Those would give me a pair of wheels for not much compared with the £250/wheel paid for ally ones by one York member - they're not available any more as the maker emigrated to NZ a while ago

Cheers Col
aus230
aus230
WA
1660 posts
WA, 1660 posts
21 Mar 2012 10:18pm
Great, post some pics of your build, every bit helps. I am going to try shwarlbe kojaks x2" tires on the new wheels as the rim will be narrower than my other rims that take the hookworms.
www.amazon.com/Schwalbe-Kojak-Tire-Wire-Black/dp/B001IB3DSQ

Cheers
Vic
Nikrum
Nikrum
TAS
1972 posts
TAS, 1972 posts
22 Mar 2012 10:05am
"G'day Vic and Col,Vic,
We have had some discussion on the construction of Wheels. However some of us have a little difficulty getting the ideas together and putting them into reality..

Surely between you the experienced one could get into a huddle with others experienced in such matters and put together a Blow by Blow account of "How to build Wheels" or some sech.
For instance I believe the HUBs have had mention but materials and design require a little more graphic discussion. I have a furnace which I am thinking of Smelting Ally down in and casting Ally Hubs (Cos I can) so suitability of Mag-alloy is a point in my mind. Furthermore I understand the initial layout of the Wheel Discs but what of the joining, one can not see inside a Rim to understand how the Webs tie the discs to one another.. There is a great deal that has not been discussed in this matter and it is complicated..

Ron
aus230
aus230
WA
1660 posts
WA, 1660 posts
22 Mar 2012 10:21pm
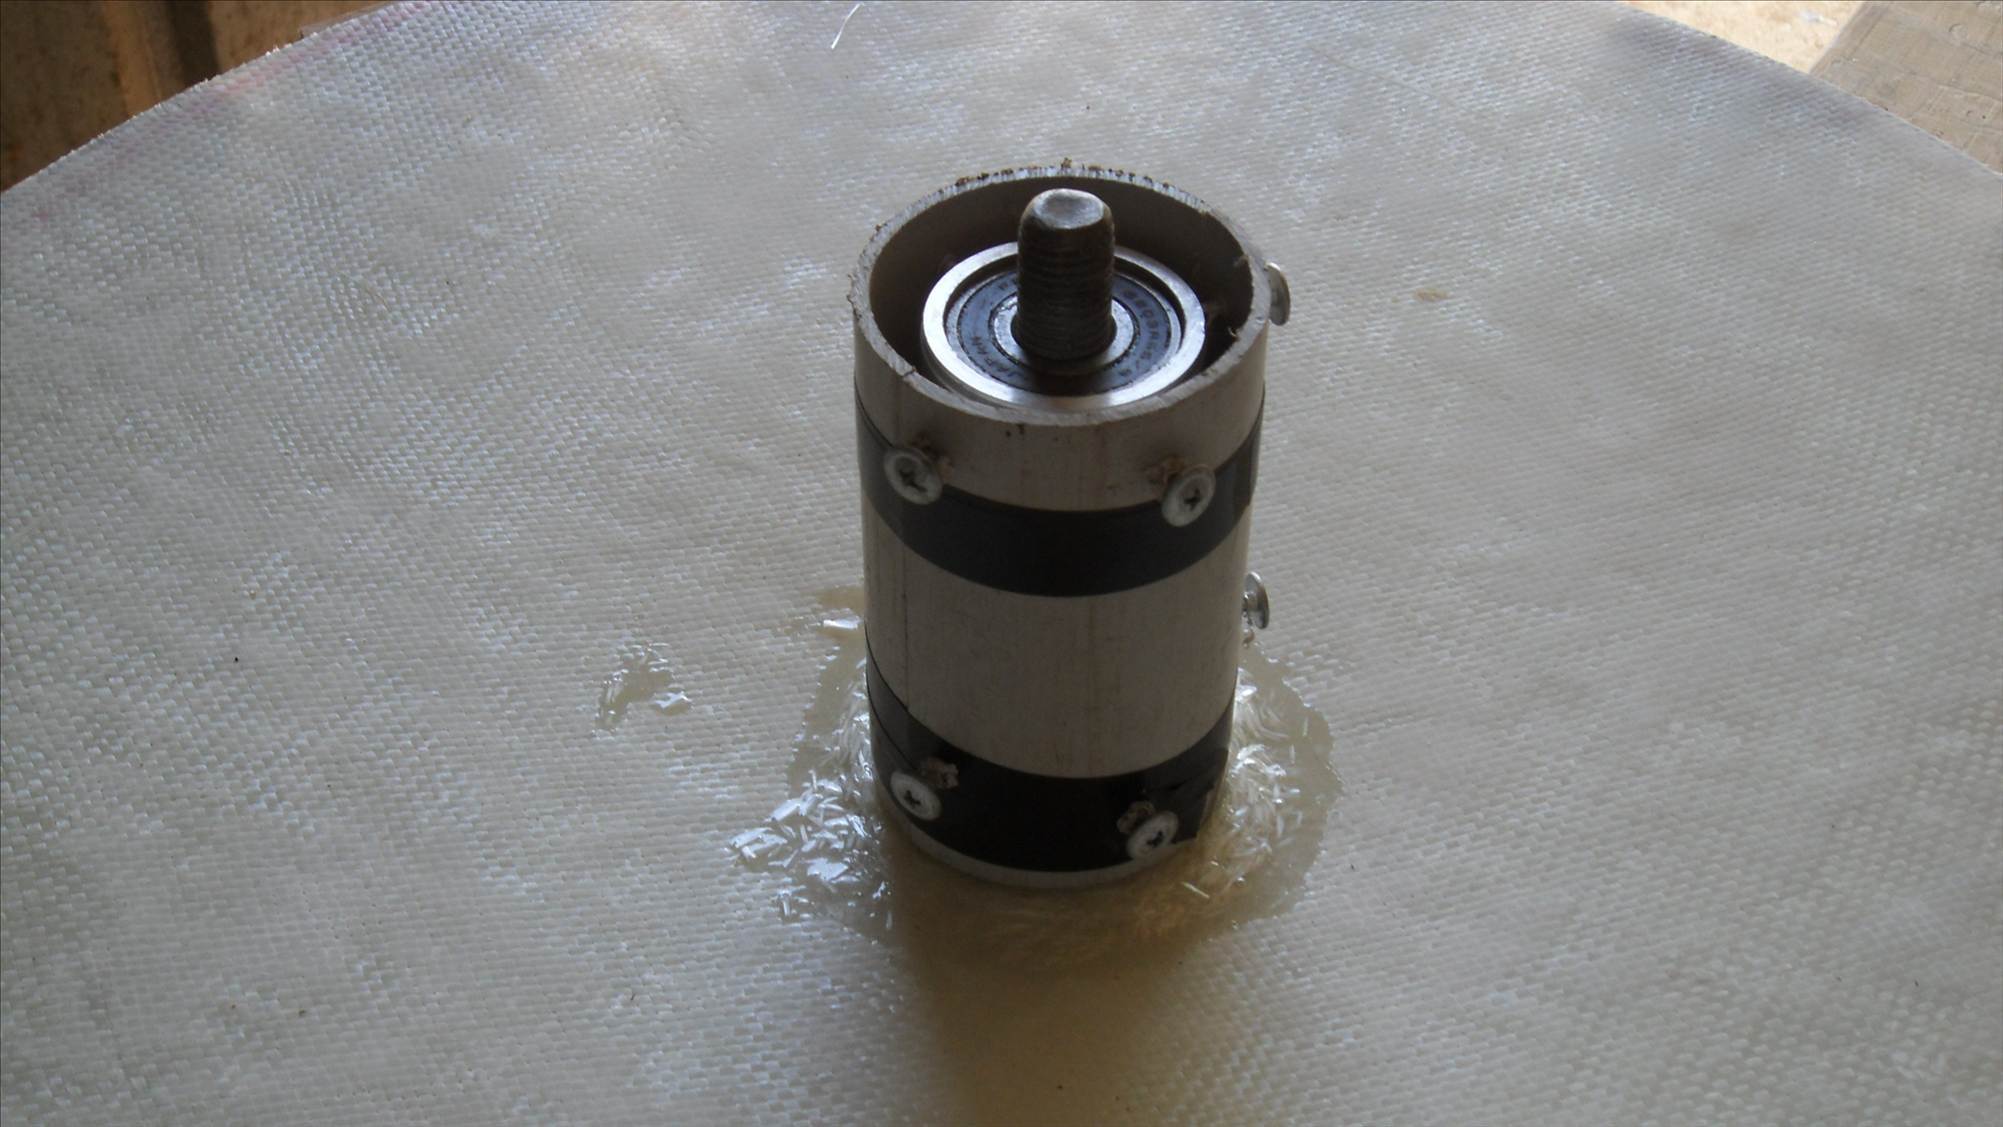
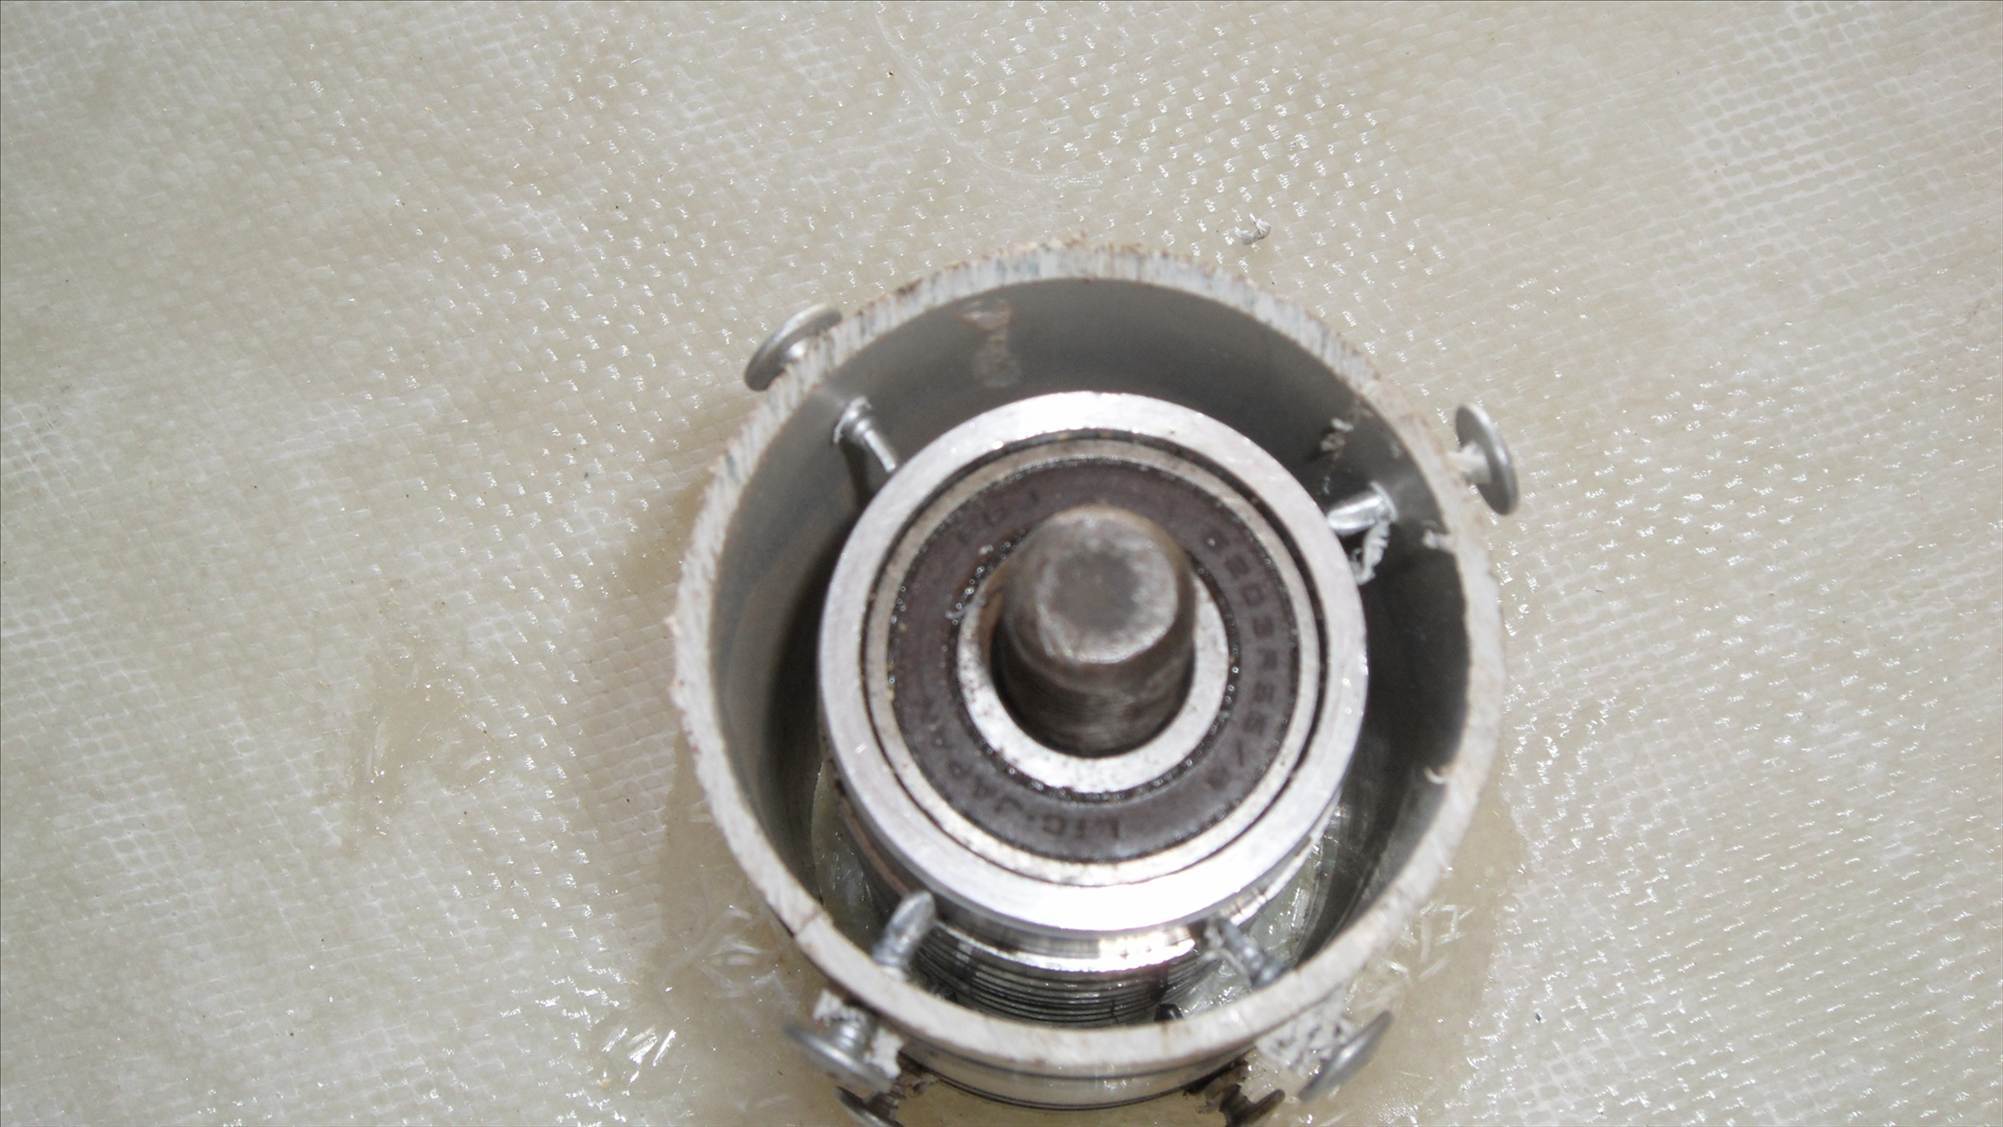
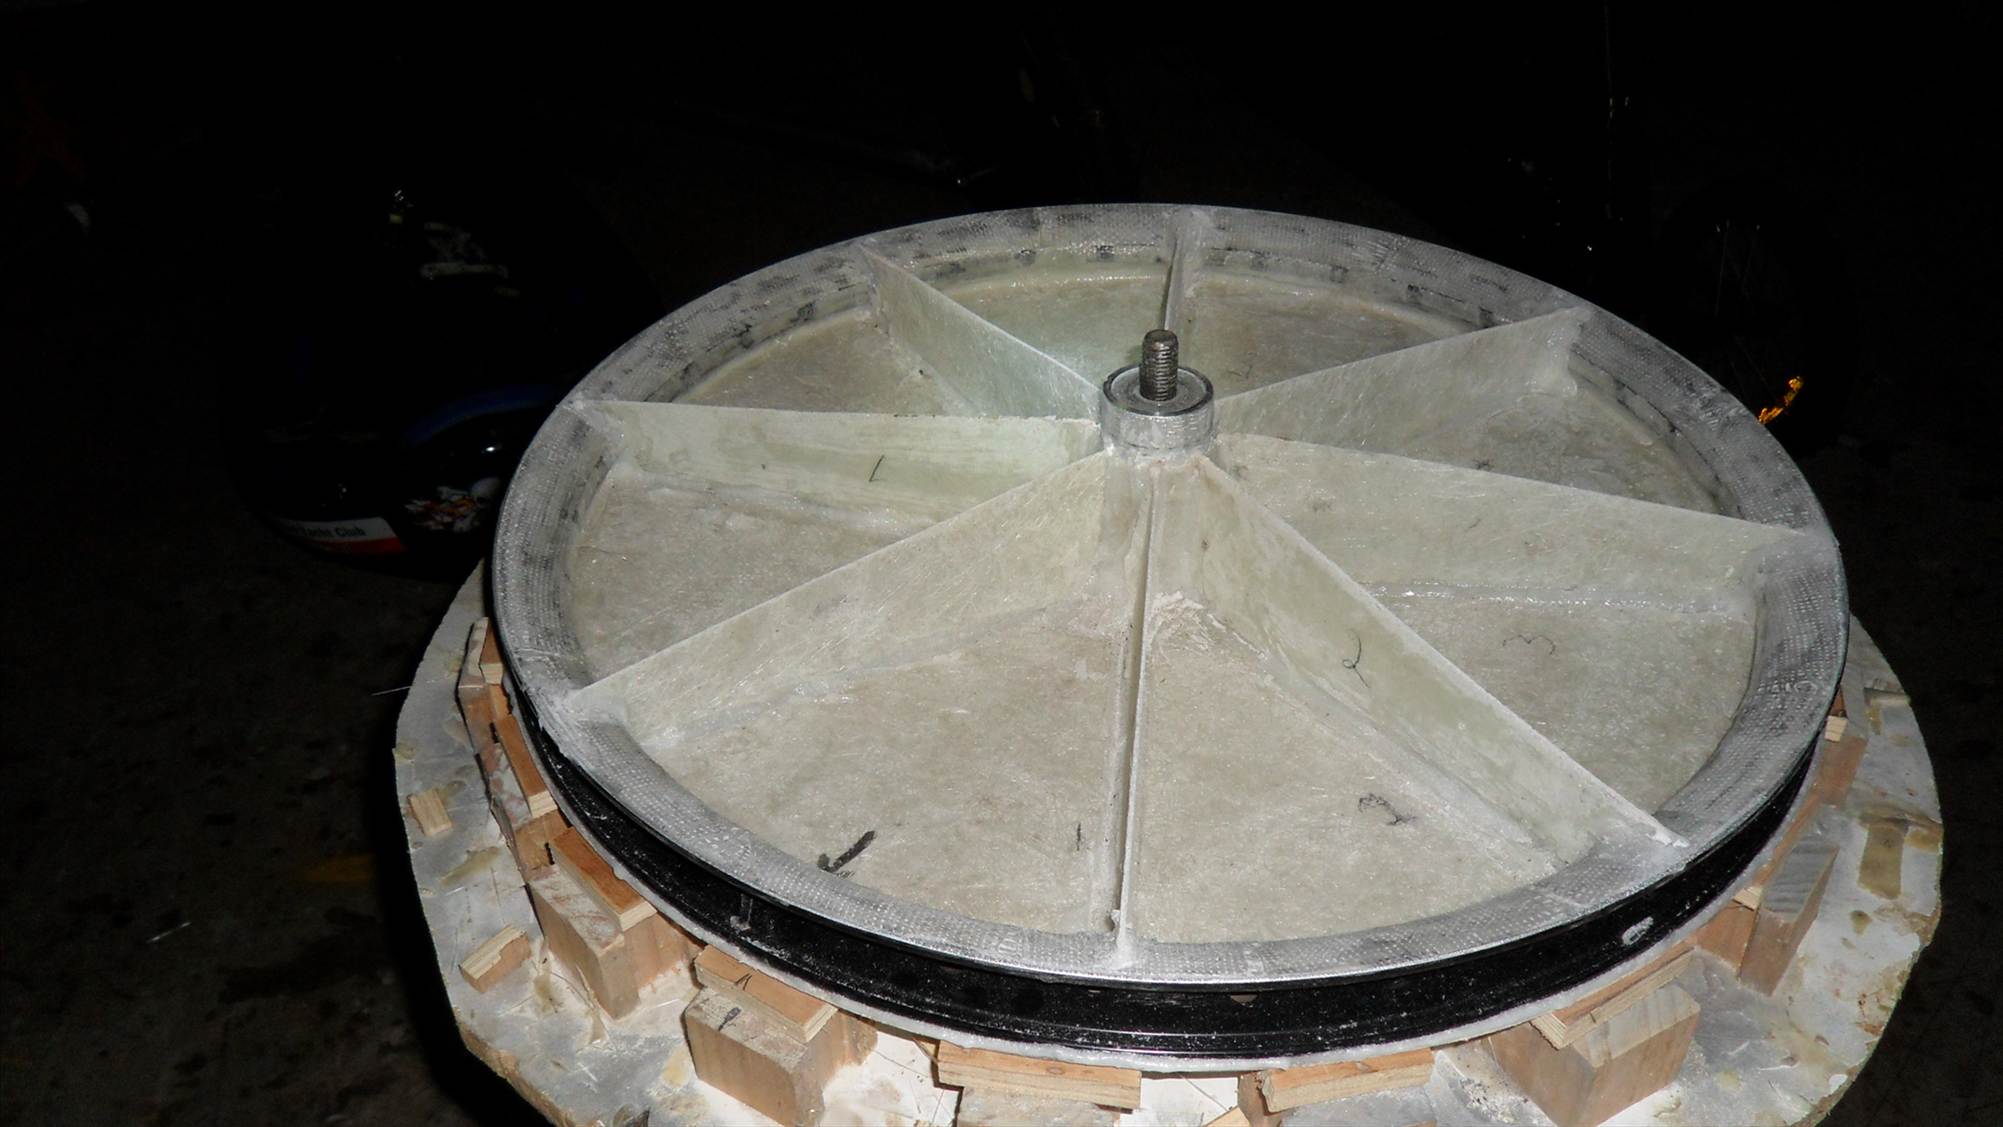
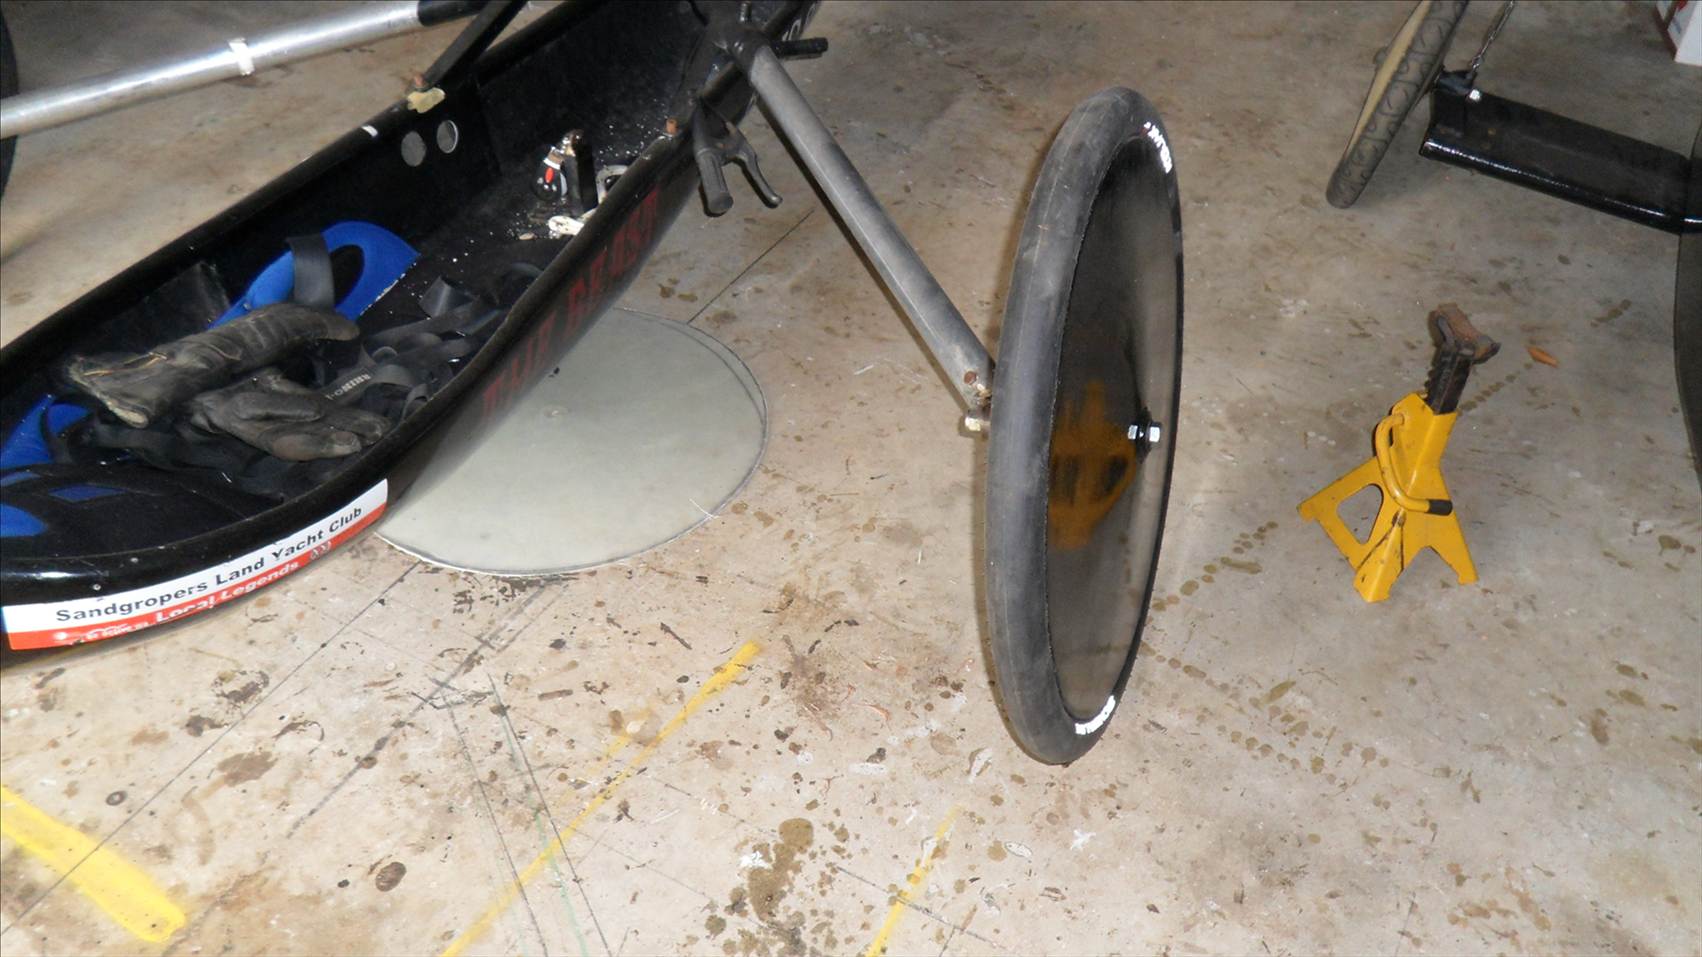
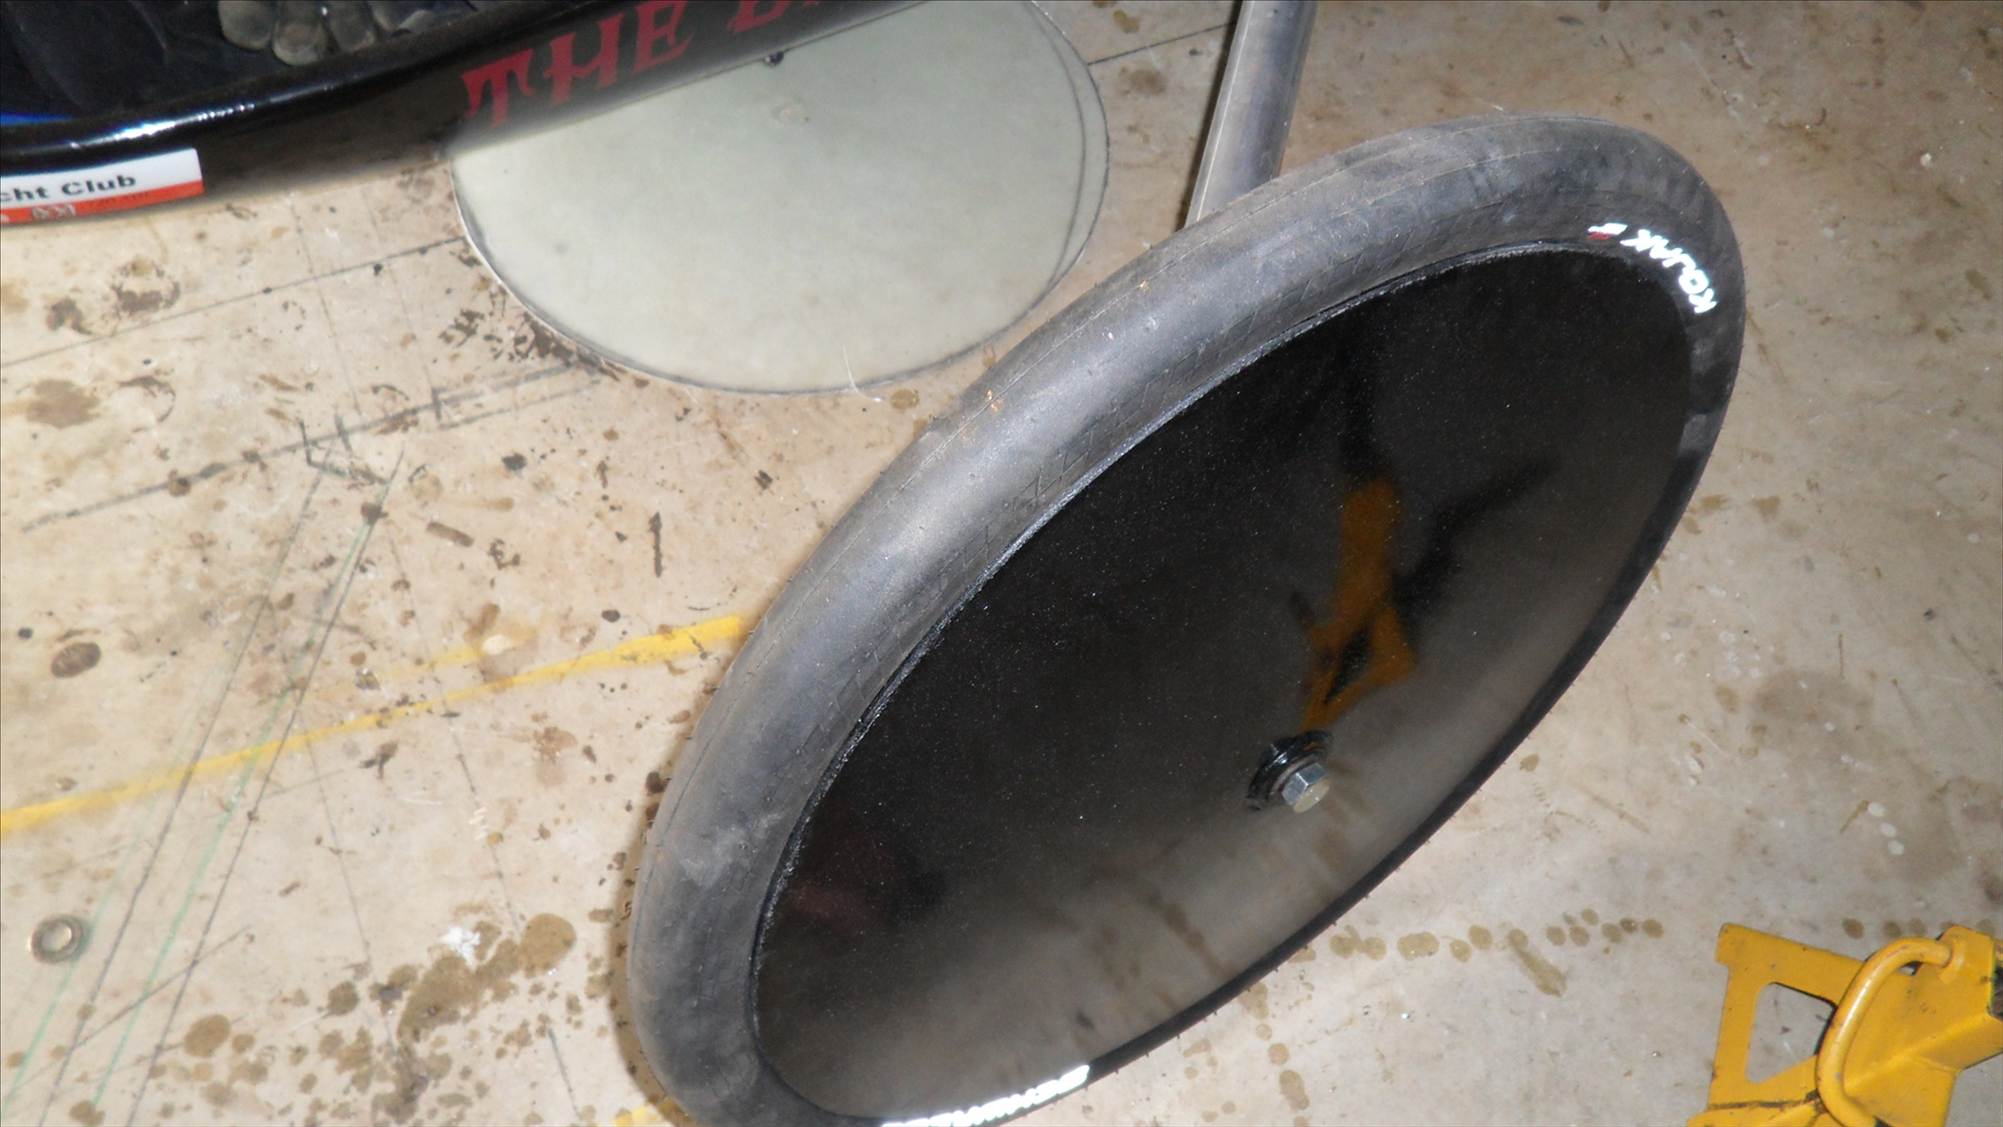
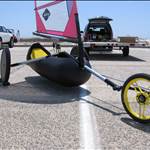
I thought most of it was done, Paul's wheels use a different hub than mine, I am now using Aluminum tube 50mmx6mm wall thickness. The center is lathed out to bearing size.(42mm or 40mm depending on the bearing,s used, it is only cut in 12mm to accept the bearing.

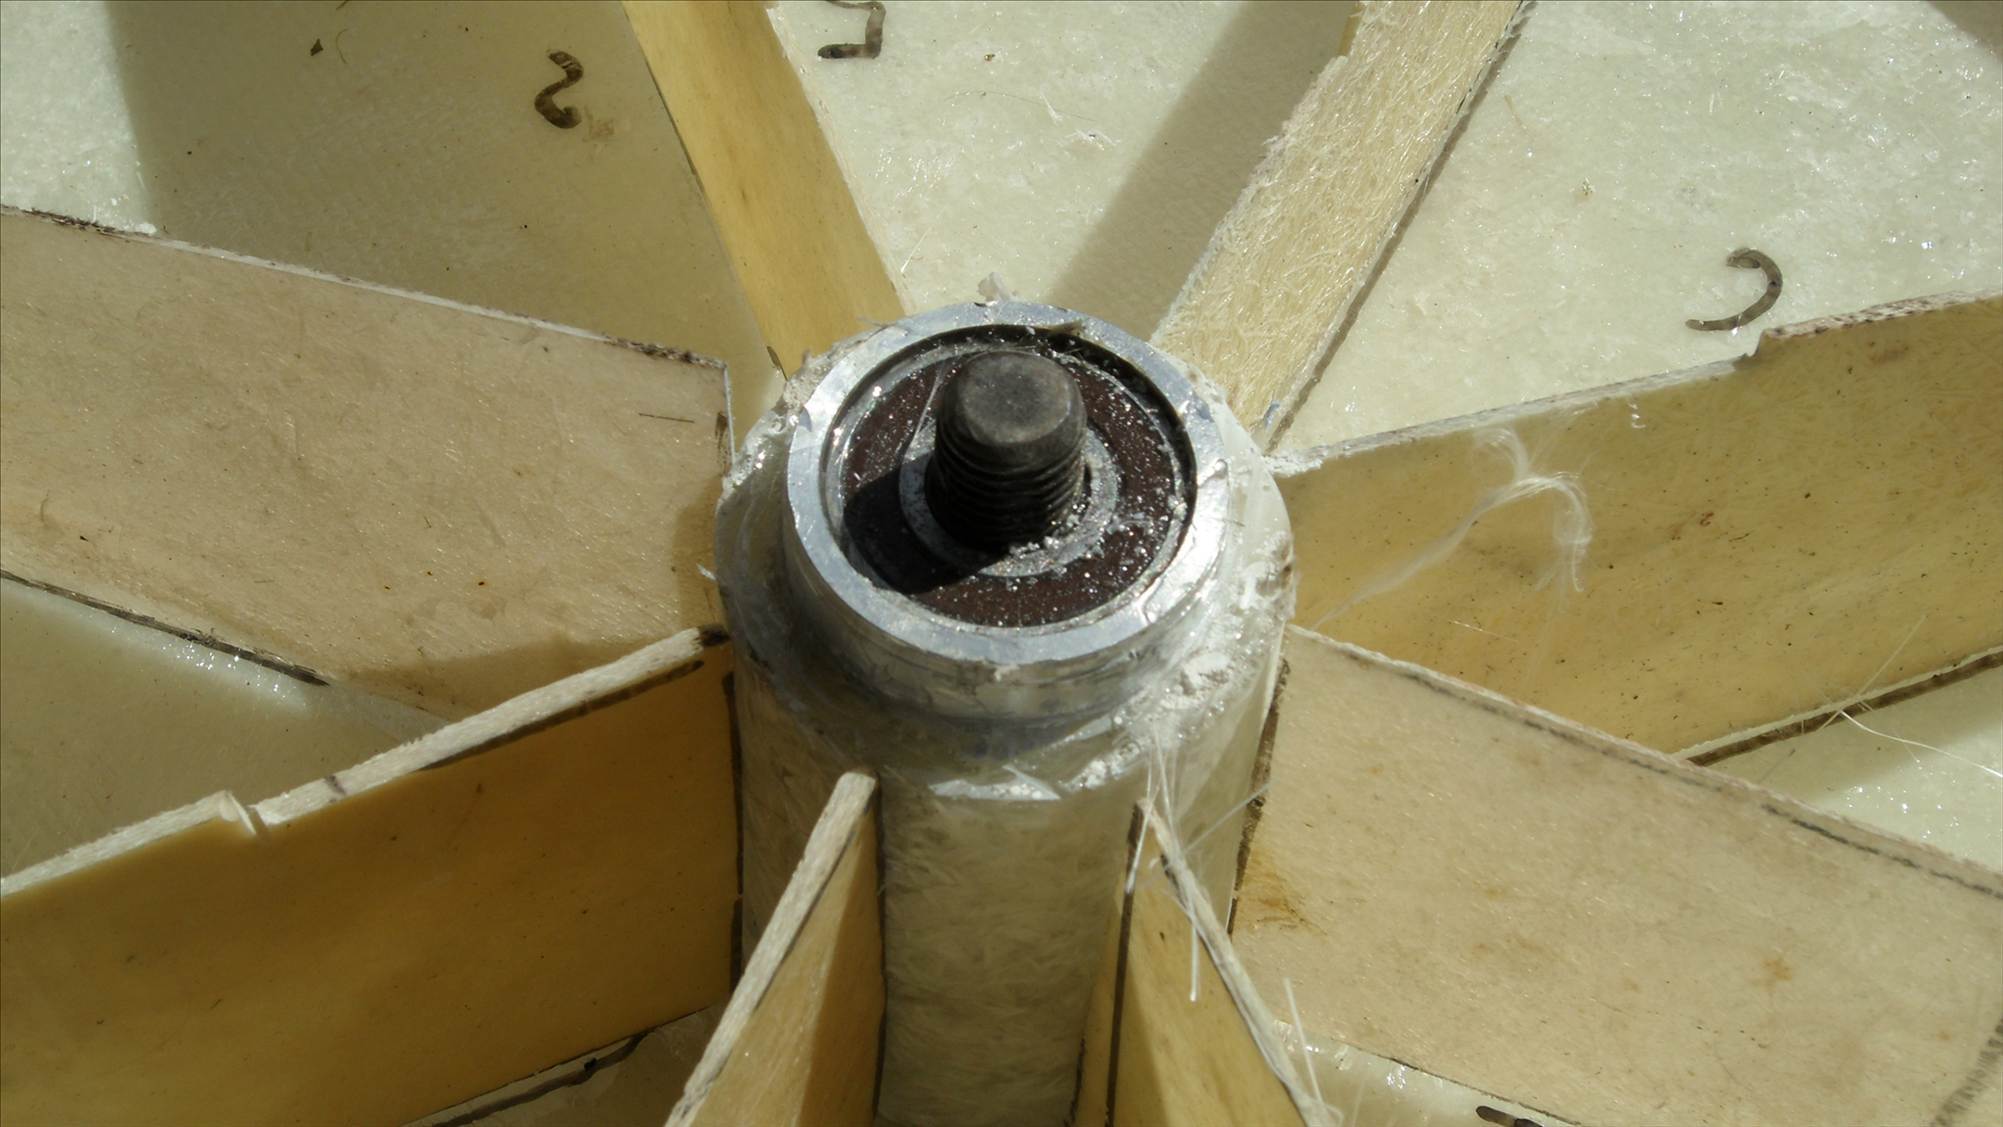
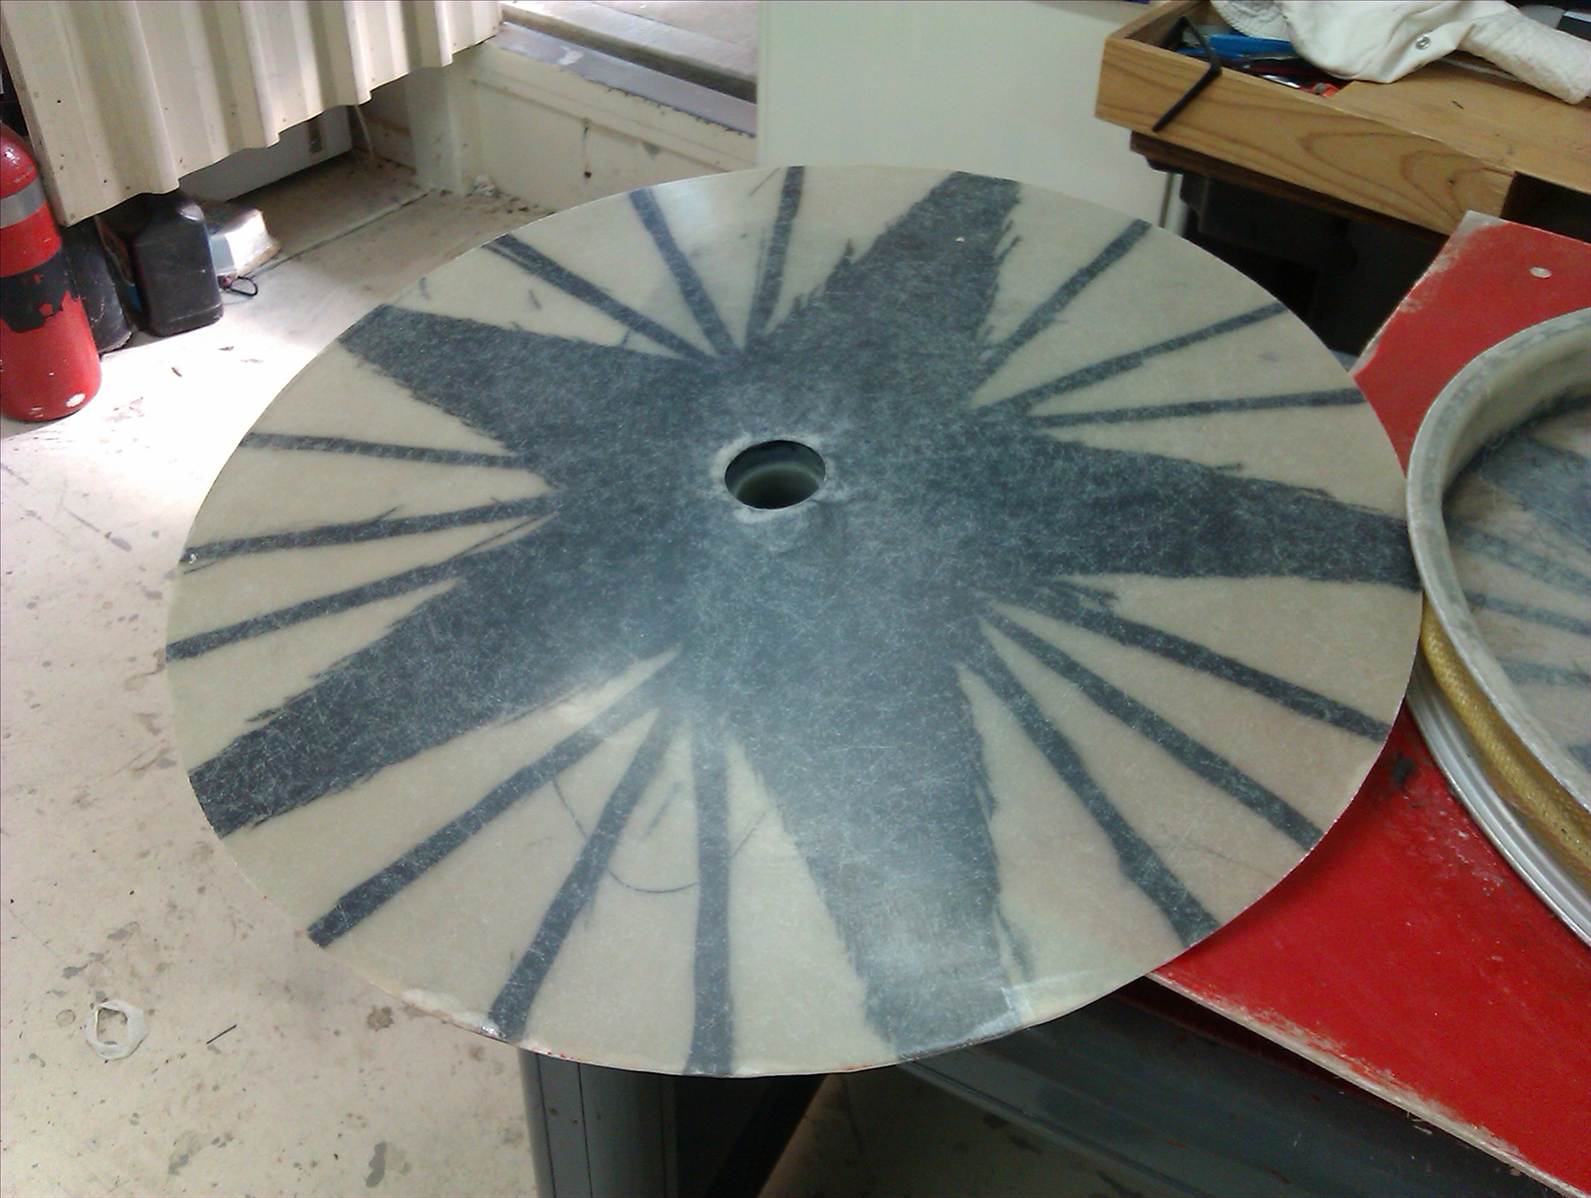
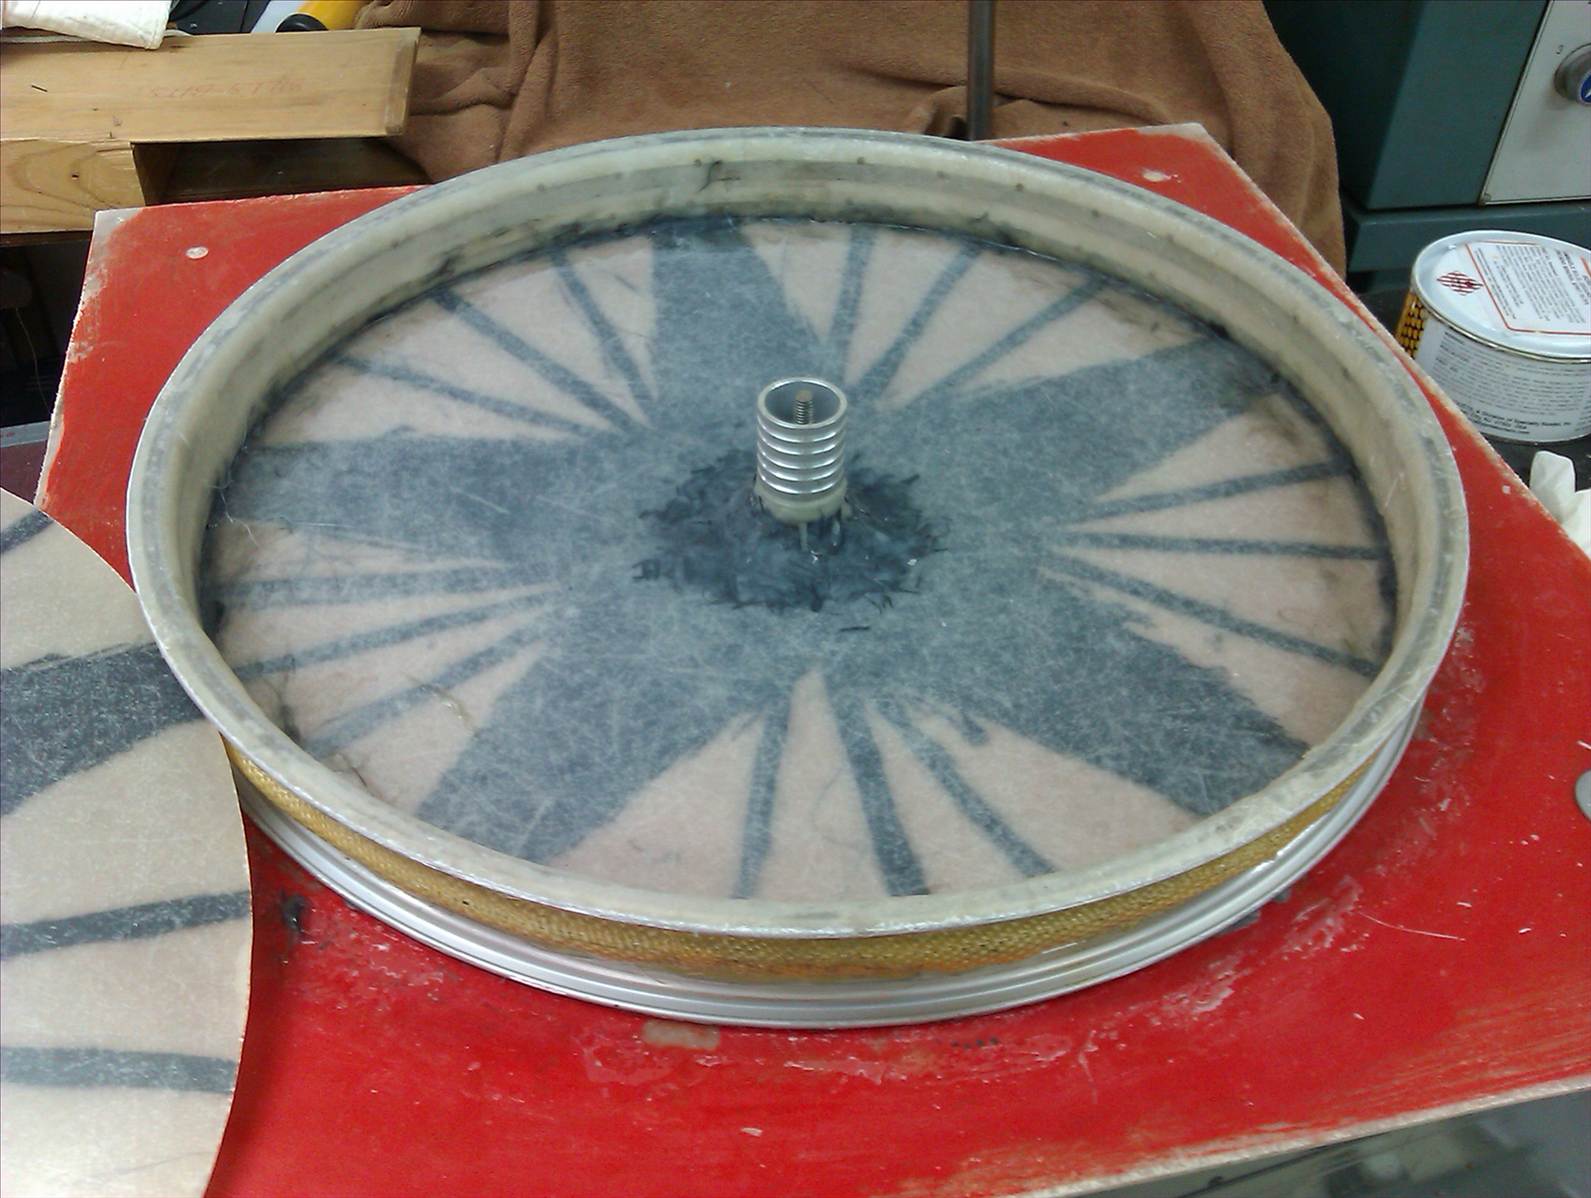
The hub is 112mm long with several shallow groves cut on the outside to key in the resin/fiberglass.

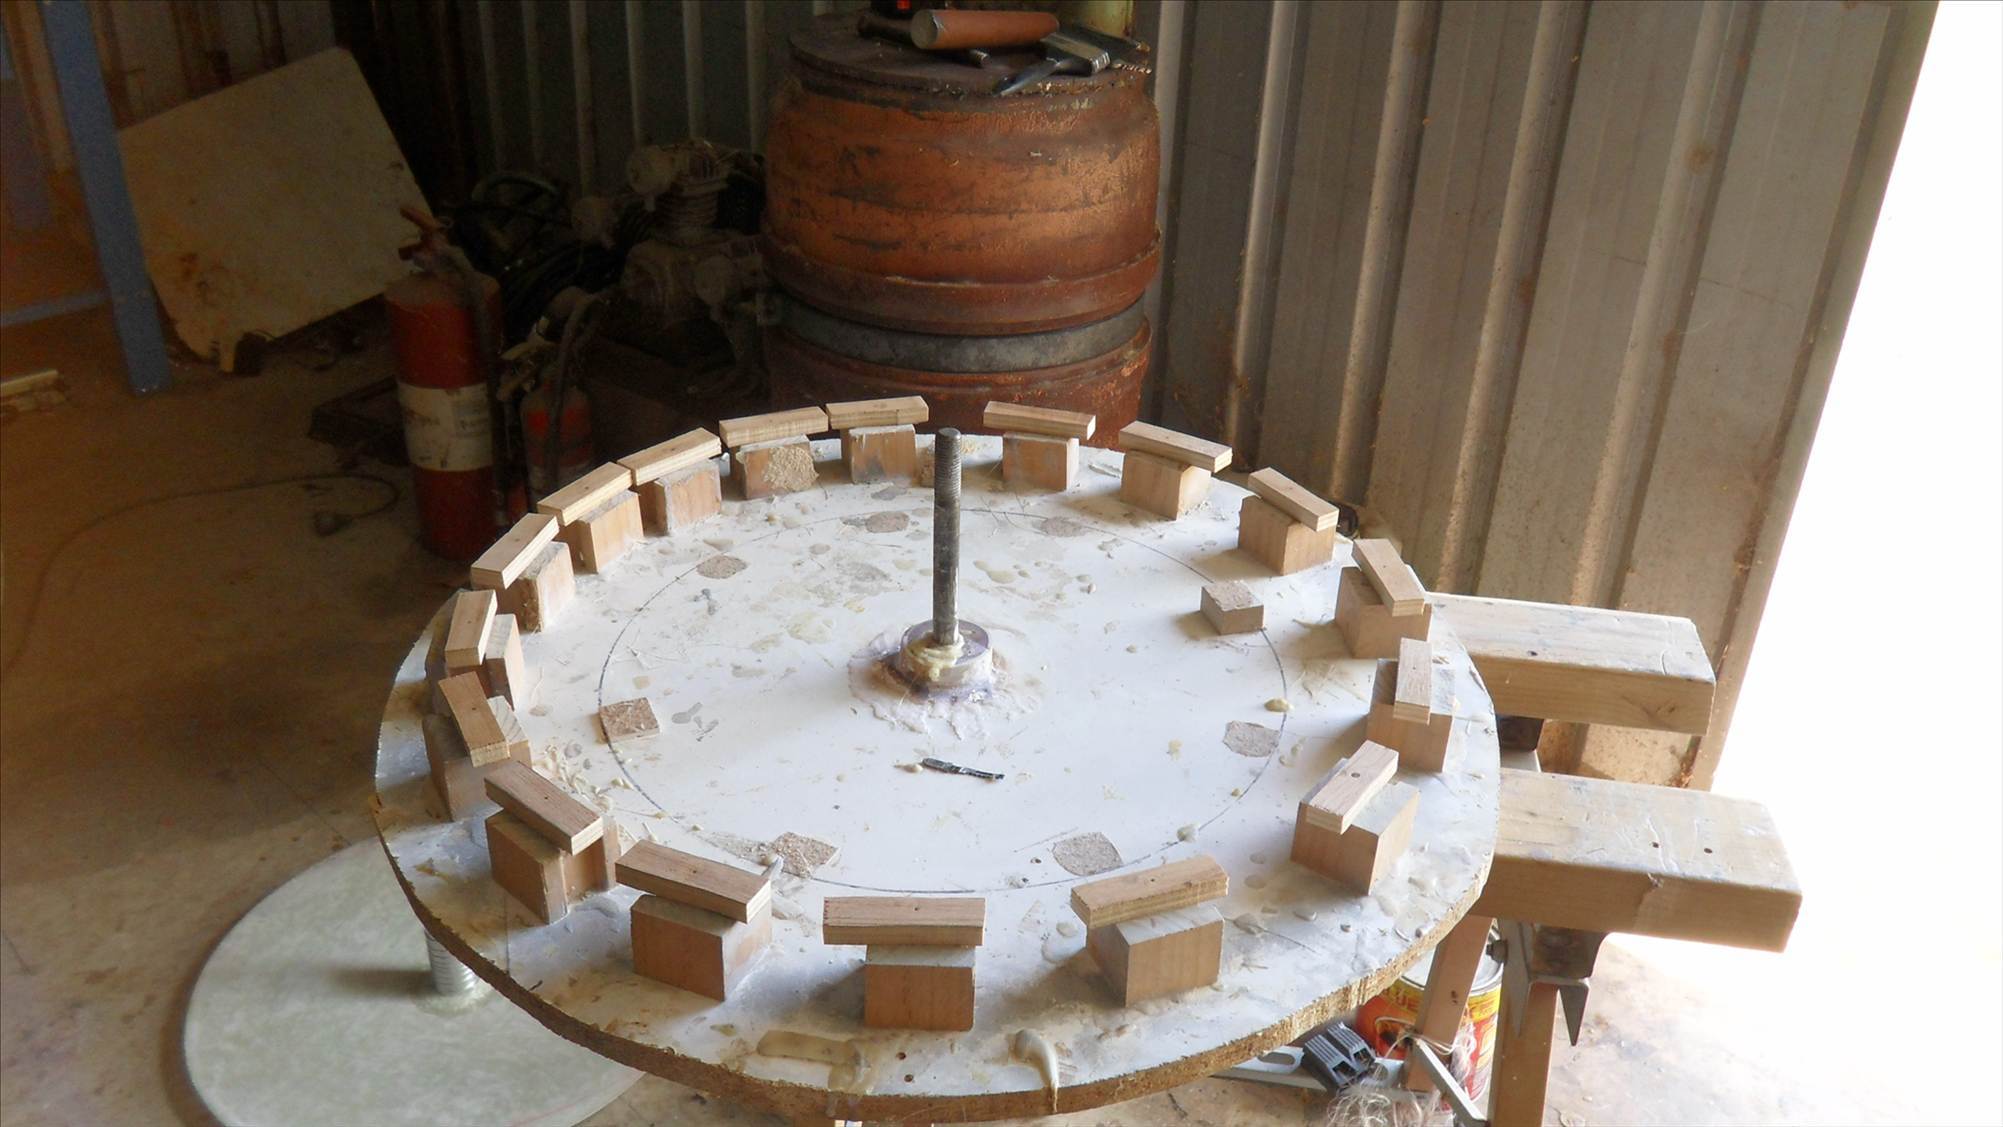
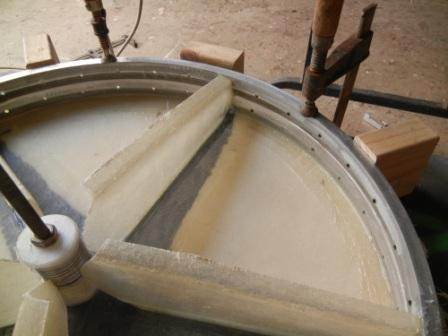
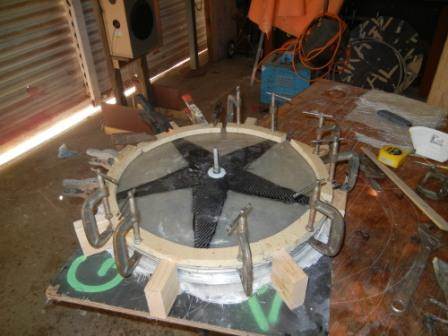
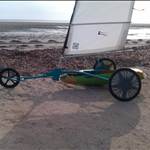
I made a mold to go around the hub on my last wheel but this time I am going to wrap it in a couple layers of chopped strand. I think the spoke,s are self explanatory as per the posts.

I use 8 spokes and Paul uses 5

I use epoxy resin. I think Paul uses polyester resin which is about a third of the price of resin (Paul can you confirm this as I need to save a buck or two)

The whole think is quite easy as long as the gig is all square to line everything up.

One thing that is really needed when using these wheels is a strong spacer between the bearings so that the axle bolt can be tightened right up, other wise the wheels will vibrate and in my case bend or break axles.

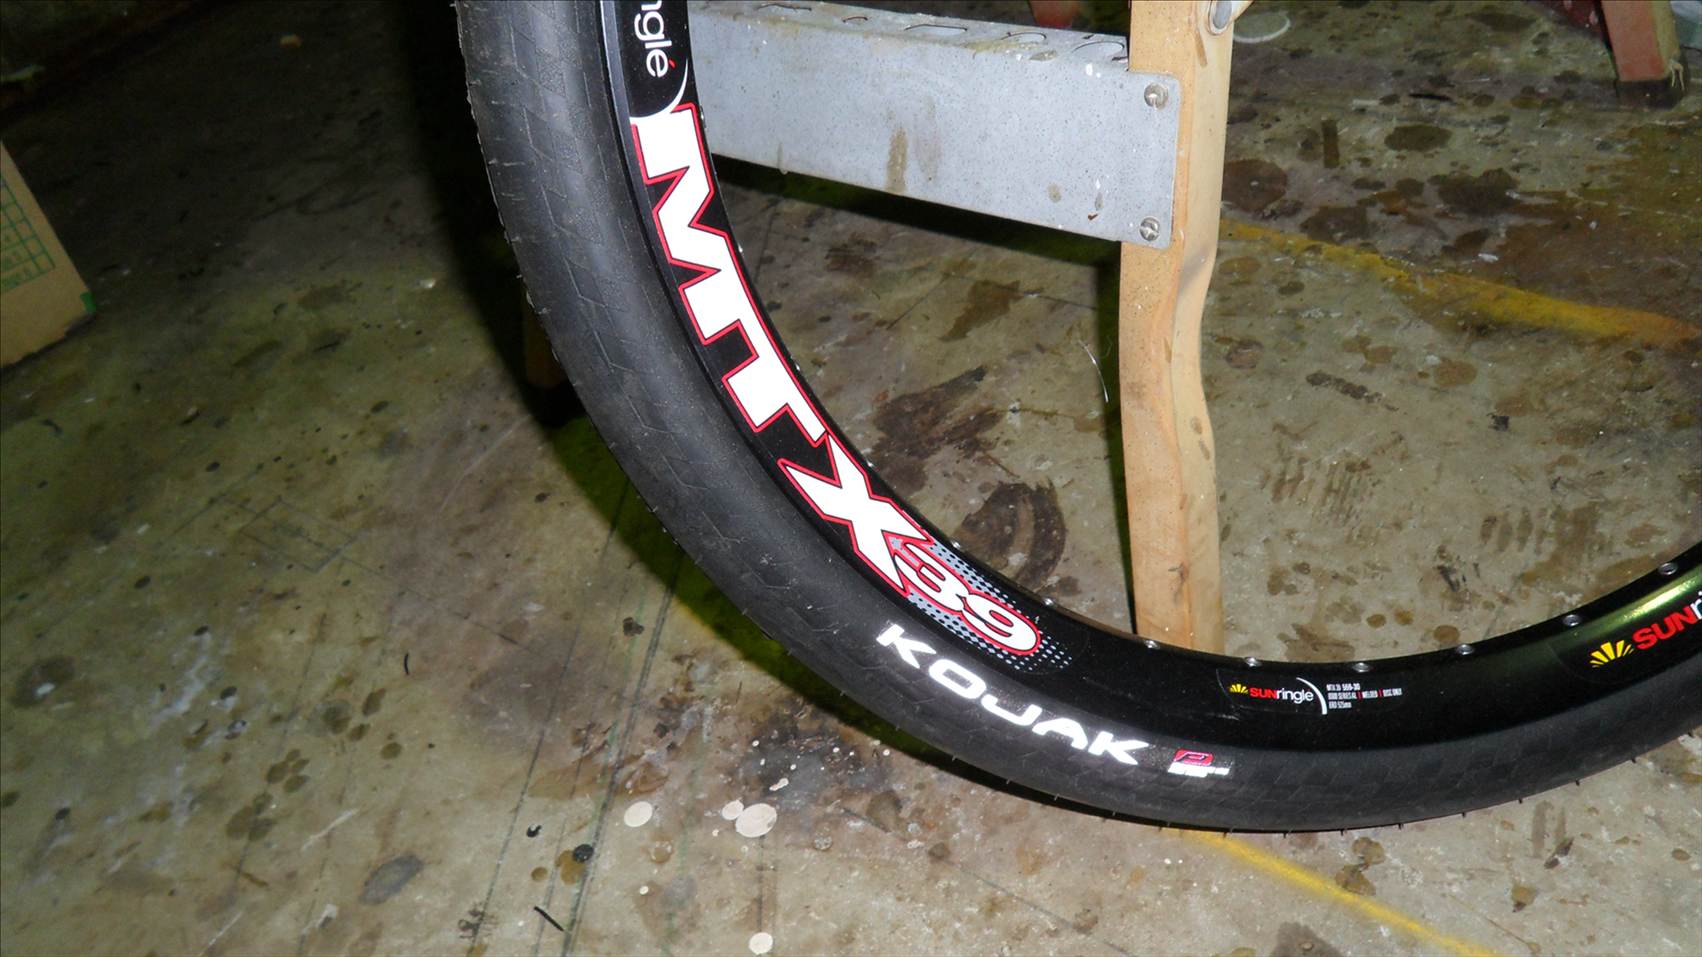
For my next wheels I am going to use 26"x39mm wide rims.(found a couple)

Maybe Paul and his mate in Adelaide can add more to this.

Cheers
Vic


Nikrum
Nikrum
TAS
1972 posts
TAS, 1972 posts
23 Mar 2012 9:49am
Thanks Vic,Now to labour a point, you have shown detail work and given me ideas about Hub design though It would be nice to see the internals Spoke design. For instance, the width comparison of said spokes compared to Rim etc. Don't be afraid to load up the pic's. I should think one could go overboard with Disc thickness etc.

At this point Wheel making is conjecture on my part however you never know I could suffer a Brain Fart and finish up making a pair or three.
Thanks
Ron
aus230
aus230
WA
1660 posts
WA, 1660 posts
23 Mar 2012 8:34am
This is what Paul has done for his spokes, I think it is better than the way I have done mine.(we are all still improving things as we make new wheels)

after the next disk has been layed up the rim has been glued and also the 5 ribs(72degrees ,in case you were wondering. the ribs were cut from some sheets of 2layers of chopped strand that i layed up earlier in the week,on a sheet of galv house flashing. as it had a folded edge I was able to incorporate that into a face that can be glued to


yankeesailor
yankeesailor
56 posts
56 posts
23 Mar 2012 11:47am
One thing Vic that has bugging me since your first post awhile back on your wheel construction. the ridge in the middle of the two rims where the two are welded together does not interfere with the inner tube when inflated, and the hole for the valve stem is not centered anymore using two rims. Do you drill a new hole for the stem or just force it through a offset existing hole.
Nikrum
Nikrum
TAS
1972 posts
TAS, 1972 posts
23 Mar 2012 3:20pm
Thanks Vic, that is agreat insight into the construction. Any upgrades/improvements should be photograpfed and posted into these pages..

I would imagine that one would have to be pedantic about measurements and weights to ensure the Balance isn't to far out??

Great Stuff,
Ron
aus230
aus230
WA
1660 posts
WA, 1660 posts
23 Mar 2012 3:24pm
On the steel rims that are welded together there is virtually no hump so I drill a new hole in the center of the rim, not sure where Paul drills his

I think the process in laying up the glass pretty well evens out the weight the most That I have found with mine has been 15gram out of balance with Tyre fitted
landyacht
landyacht
WA
5921 posts
WA, 5921 posts
24 Mar 2012 1:13am
I am rather careful about the wieghing out of the resin. 600gms for each disk,200gms to glass in the spokes,150gms to make a 4' length of spoke sheet.
I precut all the glasspeices and lay them out in order ,no ripping off sticky lumps from the roll as you go. this is a job where order and cleanliness make the finish better.
i have templates for every bit of the process.
Ive made 5 rear wheels now and number 5 only needed .5 gm of lead to balance the rim. one of teh 20" I made didnt need any.
history yet to be written may likely show my wheels to not be tough enough, but i'll only find that out by giving them a flogging.
40mm rims should be brilliant.
make sure you use a good quality epoxy glue when glueing ythose joints, and you just cant have enough clamps


kiwi307
kiwi307
488 posts
488 posts
25 Mar 2012 2:25pm
The Glen wheels did not have any tranverse spokes (like the ones you lay up on metal forms), only had the carbon ones, sandwhiched in the laminate which was pretty much all 6 oz boat cloth slightly rotated on each layer to get the fiber orientation. Clamping was done with a bit of fire hose inside sections of plubing tube slit. Does not describe well and too long ago to have had digitals.
Take a section of 4" PVC, about 3" long, then slit along the length, slip the slit over what you want to clamp, then pump up the bit of hose, which is running inside the tubes.
landyacht
landyacht
WA
5921 posts
WA, 5921 posts
25 Mar 2012 8:46pm
yankeesailor said...

One thing Vic that has bugging me since your first post awhile back on your wheel construction. the ridge in the middle of the two rims where the two are welded together does not interfere with the inner tube when inflated, and the hole for the valve stem is not centered anymore using two rims. Do you drill a new hole for the stem or just force it through a offset existing hole.

the middle ridge is lower than the outer ones as it has been tig welded.after sanding off any sharp bits,glueing in balancing weights,I cover with plumbers tape. I just use one of the valvestem holes, and pump up as usual.
the great thing about recycling the rimsis that you retain that little bead on the rim which catches the wire rim of the tyre and allows much bettertyre seating,and higher pressures

VindisDad
VindisDad
117 posts
117 posts
25 Mar 2012 9:49pm
Hi Guys,
Here's a pic of my 1st wheel not joined yet, pretty much as per Pauls.
I used vinyl ester resin & used same mixed with cotton flock & chopped carbon for gluing.

I'm halfway through 2nd wheel - can't test any till I make 2!


aus230
aus230
WA
1660 posts
WA, 1660 posts
2 Apr 2012 10:41pm
Hi Bill.
Couple of pics of the wheel built on 39mm wide rims, also tire that I am going to try. I think they will only be suitable for hard surfaces
Cheers


VindisDad
VindisDad
117 posts
117 posts
3 Apr 2012 1:11am
Looks good Vic,
What did rim weigh?
aus230
aus230
WA
1660 posts
WA, 1660 posts
3 Apr 2012 8:21am
It is a MTX39 rim, I got mine second hand . The outside of the rim has to have the paint sanded of so that the resin has a good key to bond to.


• Width - 39mm
• Bead Width - 39mm
• Inner Bead Width - 30mm
• Section Height - 27.5mm
• Weight - 850g
aus230
aus230
WA
1660 posts
WA, 1660 posts
3 Apr 2012 4:21pm
One wheel finished. Complete with tire and bearings it comes to 3.2kg.


Gizmo
Gizmo
SA
2865 posts
SA, 2865 posts
3 Apr 2012 9:03pm
Here is a hypothetical question, as we know larger Dia wheels work better and roll easier than a smaller BUT larger wheels also act as flywheels at speed which takes additional force to get up and rolling.
Is there a better balance between large v small wheels.
Maybe 20", 24"?
Would the tyres be strong or suitable enough?
I know it might be a gut feeling but is the acceleration with the 26" wheels better / worse than fallshaws?
The top straight line speed is obviously better.
Would they work better / worse on a short course?

I know most of those questions could be answered with extensive testing, but I'm just after a gut feeling.
landyacht
landyacht
WA
5921 posts
WA, 5921 posts
3 Apr 2012 8:05pm
although the wheels are taller they weigh about the same. the tyres are rather light. those kojaks are less than 300gms!!. with the weight evenly spread we are trying to avoid a flywheel effect where the weight is concentrated at the outside.

there is a difference in the acceleration and when it happens.
my observation has been that with the long narrow contact patch you can move your weight back a long way. when the power cuts in the yacht doesnt slide out at the rear as it would with that weight balance , instead it continues accelerating, and pointing higher.
you actually feel like the acceleration is slow but the gps tells otherwise.
you need to harness that by sheeting and steering to take advantage of the changes
aus230
aus230
WA
1660 posts
WA, 1660 posts
3 Apr 2012 9:15pm
Maybe Bill and Paul will be able to say what they found the difference to be going from wheel barrow to 26". I can not comment on that as the first class5 I built had big wheels. I was helped by the Kiwi,s at Pacrim in designing my first 5.

What I have found is that I am left at the line by the wheel barrow yachts.(they can reach the ground to push in the standing starts that we have in Aus.)Probably not a wheel thing but a starting method.(I am happy with the standing starts all though it makes for a hard race seeing everyone leaving me standing on the start line)Look at what I mean it the last post of the link below (vid)

www.seabreeze.com.au/forums/Land-Yacht-Sailing/Events-Competitions/Sandgropers-Lake-Walyungup-events-20112012/

In strong winds the top club88 are hard to beat(wheel barrow wheels) at the sandgropers venue.(lots of change of direction. So I guess what I am saying it is horses for courses
VindisDad
VindisDad
117 posts
117 posts
3 Apr 2012 10:18pm
Hi Guys,

A couple of things from experience of all kinds of wheels - using class 5 as a reference.
First up wheelbarrow wheels feel fast as they are turning faster and you feel more vibration & definitely acceleration is hard to beat with wheel as light as Fallshaws.
They work best on hard ground (salt, claypan), but are more limited when sand gets soft.

Going to 20" wheels only starts to work when you get them light and rigid enough. They have really got to be down to an equivalent weight to a wheelbarrow wheel to make a difference on hard ground. Even then, they need to be rigid and wide enough to hold the tyres in shape when sailing to get an advantage from them.

This is why I risked using light weigh wheelbarrow sized wheels in Ivanpah.
The American yacht 20" wheels seemed to not quite match them. (nothing wrong with their sails).

I did have a sail of one of the French yachts with the 26" wheels in Ivanpah - It was in a different league to the rest of us even then.

More later!
Hiko
Hiko
1229 posts
1229 posts
4 Apr 2012 6:07am
I thought the pacrim standard wheel was 24 inch ?
Why were the americans using 20 inch ?
My original sulky wheels were 24 inch and were supposed to meet that standard
VindisDad
VindisDad
117 posts
117 posts
4 Apr 2012 6:21am
I think the standard was something like 550 mm max so it was whatever fitted under that.
We used 20" here for a while.
Hiko
Hiko
1229 posts
1229 posts
4 Apr 2012 6:34am
aus230 said...

One wheel finished. Complete with tire and bearings it comes to 3.2kg.

quote]

You are getting them light The ones I made with f/glass rims came out at 4kg all up
aus230
aus230
WA
1660 posts
WA, 1660 posts
4 Apr 2012 8:35am
Hi Hiko.

I have changed a couple of things on the new wheels

New tires --kojaks are less than 300gms.

As I use 8 light spokes, I have cut back on the layers of fiberglass in the disc to 1- 8oz woven and 2- 4.5oz chopped strand.

One piece aluminum rim 39mm wide.

Material required for 2 wheels
2.5m 8oz woven
5m 4oz chopped strand mat
2Lt of resin.


This was the simplest wheel that I have made so far, I think that they can just about anyone without a problem from the information that we have shared on here.

The hubs are the only thing that will require some lathe work.

Cheers
Vic
Nikrum
Nikrum
TAS
1972 posts
TAS, 1972 posts
4 Apr 2012 11:22am
OK! Vic,
It all looks straight forward enough but when you fit the top disc you don't have access to the spokes.. How do you go about applying the Resin to spoke and upper disc?? I.E. Do you use a little chopped Glass in the mix etc?
Ron
VindisDad
VindisDad
117 posts
117 posts
4 Apr 2012 10:05am
I have built my hub up using glass, which means no machining. So far we have had no issues with failure. We did this on some wheels many years ago.
Method as follows ;

I have a delrin (plastic, nylon equivalent) plug made to bearing size, with a step to locate the joiner tube. In this case a piece of 40 x 3mm ally.
For one side I wax a piece of ally & remove it afterwards, and for the other I glass the joiner piece in pic. This is so when you glue the 2 sides together they are located & a neat fit.

The hub is formed by soaking glass roving & wrapping it around the plug to build it to around 5 - 6 mm thick at the base. This is then backed up by a 'bog' of resin with cotton flock & chopped carbon in it.
And thats it. I also make sure that the hub part where the ribs go to is bogged in as well.

Have a go Vic , it might save a lot of grief.
aus230
aus230
WA
1660 posts
WA, 1660 posts
4 Apr 2012 11:05am
Bill that makes it a lot cheaper and easier for anyone who has not got access to a lathe(I have one) Maybe you could show a pic of the plug. I should imagine its the only part that would have to be turned and would only require one as it would be reused for all wheels

Ron
Before I fix the top disc I mark the outside of the disc to know where he spokes are then turn it over and pencil line on the other side(you can see the outside lines through the glass. I use a mix of resin and micro fill balls to butter along these lines and around any contact areas, Place the disc on top of the spokes and clamp(Need to have an identification mark on both rims so that the resin and spokes contact)


Hiko
Hiko
1229 posts
1229 posts
4 Apr 2012 1:20pm
Using metal rims has really made these wheels within the reach of many people
and using the nylon plug is another step up eliminating the lathe work on the tube
I thought doing the f/glass rims was a real pain so much so it put me off doing
any more
But this method if the rims can be got hold of has changed things a lot
This forum is great for sharing ideas
Please Register, or first...
Topics Subscribe Reply

Return To Classic site 😭
Or... let us know if a problem, so we can tweak! 😅