Hi trav,
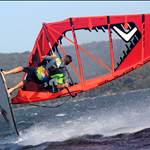
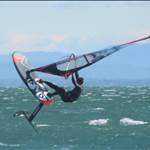
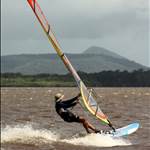
looking at your images you need to work on your metering and exposure. most of the subjects are under exposed. it's hard to get an even exposure with windsurfing in the surf and because sometimes you have no choice but to llok directly into the sun. but there are things you can do to imporve a bad situation and there are things you can do in software. looking at your last image i'd say it's on track, it is just a little too contrasty (curves in photoshop)
meteringa couple of things to try with backlit subjects to control exposure.
1. move to a position where you looking between 180 and 90 degrees to the sun
2. use spot metering when the subject is backlit
3. use exposure lock when the subject is not moving fast and is backlit
4. fill the frame with the subject reducing the amount of over blown light around the subject.
5. get up high so your are looking down at the sailor removing the sky and reducing the dynamic range.
i have a 40d, i use pattern metering in all but backlit exposures. for backlit exposures i use either spot or centre weighted depending on amount of light behind the subject, or the amount of frame i have filled with the subject.
the reason i use pattern is that on the 40d when in pattern metering the camera has some aditional metering functions including the ability to meter from a focus point not in the centre of the lens. (i read this somewhere at one point)
Settingscamera is set to aperture priority, iso around 400, shutter speed should be no less than 1000/sec, af drive mode is on ai servo, drive mode high speed continuous shooting. i also use 1/3-1/2 stop exposure compensation when in pattern metering mode or at the surf.
most people recommend to use shutter priority for sport so i am going against the grain. also be aware that when, on the 40d for example, ai servo drive mode is set the camera will take the photo even if it is not in focus. so you need to track the subject very carefully and shoot in bursts of 4-5 shoots at a time.
i mainly shoot in jpeq due to only having 1 memory card. i recomend shooting in raw especially in poor lighting conditions. i'm getting more cards so i can shoot everything in raw.
if you shoot in jpeg mode set up a custom jpeg setting that has reduced sharpening, contrast and set to adobe rgb.
i also have custom functions set within the camera, this varies on the type of photo i am taking. the one function i use in all of my setups is the ability to move the focus point from the quick control dial on the back of the body which allows me to very quickly compose each photo and control where the af point (focus and metering) is within the frame. typically i use centre af point unless i am trying to capture the scenery in the background or go for something more "artistic". never use all 9 point af.
a couple of things, nothing beats good light, sometimes when you look at something and the lighting is perfect, take the photo! good lighting improves focus, exposure and everything else about the photo. the better the lighting outcome the better the image. an example is if you take a photo from the beach, then walk 100m down the beach so the sun is at a different angle and take another photo. if down the beach gives you a better angle to the light all of those photos will look much much better.
softwarei'm not using photoshop, i am toying with a lightroom type package. ultimately they all do the same thing. lightroom type software has better work flow features though.
the first thing you want to do is adjust the black point, and white points in levels. this will remove that grey hazey look as well as allow you to change the grey point of the image. google levels in youtube as there are lots of tuts.
then you want to look at the curves, curves add contrast to your images. an s curve is the most common. for images that have over exposed foreground or back grounds you may need to use a reverse s curve. basically you are either boosting or reducing the blacks or whites respectively. another thing is to just crop out the over or underexposed parts prior to adjusting levels etc.
saturation layers allow you to boost the colours but go easy.
sharpening, a wide radius unsharp mask will clean up the haze in your images. a small radius USM will improve edge definition.
if you shoot in raw mode the photoshop bridge module gives you more features including white balance controls and clarity (sharpening), vibrance and saturation these same features usually also come in lightroom type software.
forget about all of the other layer tools etc and to be honest. less is best. most gains can be made from the levels and curves.
also, when you reduce the size of an imge by exporting or saving, be aware that you are "sharpening" the image also. with a hi res image that is in focus, you will not need to sharpen a 640x480 export jpeg for example.
my dissclaimer is this. i have had no formal training. i've learnt all that i know from books and from people on seabreeze or pro photoagraphers i know. then i have tried the hit and miss approach so i am sure there are better ways then some of the stuff above. but the above represents everything i have formed an opinion on. the thing with photography is that there is so many different ways to achieve the outcome and every lens, body and person has a slightly different take on it. but at the end of the day, light, iso, exposure, stop, metering, postion etc have the biggest bearing on the outcome and changing anyone of those individual things will change all of the others.
i'm personally am just starting to shoot in full automatic. it just provides better outcomes. i have also made the decision to forget about tripods and go for a more mobile type of setup. shure tripods in poor light can mean the difference between a good and bad photo but i've always liked the philosophy behind photo journalism. (yes that's wanky)
other than that, it's all just hit an miss.