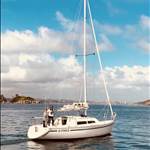
My 1980 Cavalier 28 spent ten weeks on hard stand from late Oct 25 until early Jan 26. As a newbie I did extensive research on this forum in preparation. There is a lot of great info here and hopefully I can help summarise and link to it over a few posts as I detail the project and share my experience.
My first remark is that it was exhausting which is why I didn't start writing this earlier. I actually needed another a couple of weeks on hard stand to finish things off better, but I couldn't afford the time or the fees. I needed a break and to catch up on other things. So I've probably already forgotten a lot of what I was going to share. I'll see what I can remember as I add to this topic from time to time over the coming weeks.
The next thing I would say is that it was a great experience. It was hard and very challenging but fun. Working hard outdoors. My previous experience was limited to antifouling, minor repairs, replacing the odd bit of running rigging. Refurbishing a 28 foot fin keel yacht by myself was a good size project for an inexperienced person. Anything bigger and beamier would have been too much for me to take on single-handed as a first project. If I ever get something bigger I would be confident in tackling it with another helping hand.
I purchased the boat five years ago in a fit of lockdown madness. My previous boat was a Hood 23 which gave me many years of joy on Sydney Harbour. Unfortunately, almost immediately after the purchase, I fell seriously ill and couldn't even get out to the boat unless someone rowed me out. So it rotted in the water for a couple of years which of course led to problems. It's only been over the past two years that, as my health recovered, I got to spend more time on the boat and sailing her.
Objectives:
1) Stop water getting in! The windows were leaking like crazy but I suspect water was getting in elsewhere too. Deck fittings? Toe rails?
2) Remove the exessive build up of antifoul. The last condition report, prepared just before I bought her, noted the high build up of antifoul. I suspect the rough moonscape underneath was aiding growth, especially barnicles as they litterally had little nooks and niches to cling onto. Port Hacking is notorious for its high rate of fouling. The water is shallow and clear. The bottom is sandy and reflects the sunligh. My mooring is exposed to the full tidal flow of the river, so the boat acts like a mini-reef. The barnacle growth is outrageous. I usually dive on it every three months and antifould annually. Altex No.5 Plus seems to be the most popular antifoul around here.
3) Strip below the water back to gel coat and see what state the structure was in. Was I going to find any osmosis?
4) Find and deal with any other issues. The gel coat was getting very worn after 45 years of not being well looked after. The moulded in non-skid, which has been painted over in areas, was blistered and cracked off at some places. The fibreglass was showing through in a few other of places on deck. Everything was so dull and warn, it was actually hard to work out which areas were still gelcoat and whch has been painted. Was it letting moisture into the fibreglass? I might as well strip the whole boat back to gel coat and epoxy barrier prime it and give it a paint and fresh non-skid.
5) Spruce up the boat. Make it look pretty and proud.
6) Refurbish the transom hung tiller. Although there was little chatter, there were a couple of patched areas of repair and it looked like it could do with a strip back and filling in of dings and recoating to ensure water wasn't getting in.
The next post will summarise stripping the antifoul.
Stripping the antifoul.
There is already great info on here in older posts.
Forum member Cockpit has already detailed his experience of stripping his Cavalier 28 three years ago in this discussion:
www.seabreeze.com.au/forums/Sailing/General/Thick-Antifoul-Paint-Removal-
My experience was very similar to Cockpit's. There is also another very usefull discussion on this topic here:
www.seabreeze.com.au/forums/Sailing/General/Antifoul-removal-options
Even on a 28 foot fin keel with a beam of 2.83m this is not a one person job. I had my brother help me for three days. All up it took us the equivalent of 11 days of man power to strip the hull of antifoul. It was really hard work. You have to put your whole body into it. It was almost soul destroying. You will get covered top to toe in toxic dust. My grey beard turned red and stayed that way for weeks! I showered at the boat yard every night before hopping back into the car.
The antifould build-up on my boat was similar to Cockpit's. I estimate the build up was at least 3mm thick across most of the hull. I swept up the debris each day and weighed it. We removed 46kg of antifoul.
Pressure Wash
As suggested in the threads above, I asked the boat yard to go hard with the pressure washer. I asked the operator to keep hitting it in the places it would strip off and stop when he saw gelcoat. In a few places he stipped the gel coat, but I could live with that as I expected I would need to do some patching and fairing anyway, and I was going to be epoxy barrier priming the hull anyway. Not surprisingly he was reluctant to keep at it and getting wet, but I asked the manager to keep him at it for the full hour I was paying for!
Before pressure wash - note I had only recently scraped the bottom


After pressure wash. Note that the top green layer of antifoul was painted in 2024. All the red layers were from the years prior to 2024.


Bahco Ergo 665 Scraper
We used the Bahco 665 scrapers as recommended in the two threads linked to above. We didn't grind the corners of the blades as others have done. It didn't seem necessary. I think we used around eight blades all up.
Both Sydney Tools and Total Tools stock the Bahco 665 scraper and the Bahco 451 Replacement Blade for 665 ERGO Scraper.
WARNING: Stores generally only hold one or two of the scraper and replacement blades in stock. You will need a few blades. We used eight. The bloke at Sydney Tools Kirrawee told me that it can take them some time to restock Bahco products because Bahco have a minimum order and it can take a while before they can get fresh stock. I made the mistake of not stocking up on the blades well in advance of hauling out. I was in a panic so I ordered four blades at Sydney Tools Taren Point and went across the road and ordered another four from Total Tools. Sydney Tools made me pre-pay for the order and assured me they would have them in between seven to ten days. Total Tools did not require prepayement. I kept checking with the both stores as I despirately needed those blades.
The guy at the counter at Total Tools told me my order had not come in, but I asked him if they had received any stock from Bahco and he said, yeah actually they did just receive a delivery. So I walked down to the shelf and found they had two out on display. I grabbed those and told him I would take the other two when they came in. Unbelievably, Sydney Tools phoned me eight weeks later to let me know my order had come in. I was furious and asked for a refund and they refused because it was a special order.
You will work out a technique for using the scraper. You have to put your shoulder and torso into it as you pull it down or across with heft. Some places the antifoul will come off in nice chunks. Other places it will be so hard you just shave away at it. You have to throw yourself at it. Attack. Have a short break. Attack again. Work yourself into a trance.
As you can see from the photos below, you will also shave off very thin shards of gel coat but it is negligable and you are going to be sanding and rolling on a good build of primer. Sometimes you will catch the corner of the scraper into the gelcoat and gouge out the gelcoat down into the fibreglass. This will be filled and sanded later.
Stripping antifoul from hull


There was only one wet spot below the waterline where the gelcoat was damaged and letting water in. Fortunately, there was no sign that this spot was suffering from osmosis. There was no acidic vinegar smell. It dried out within a day and didn't weep. It got cleaned out and bogged in later on.
to be continued.
Thank you for sharing !
+ sense of achievement
Also at a doable scale for 1+,as bays littered with discouragements,that are beyond recovery,due to size .
Hi thanks for your indepth posts.'
where abouts did they allow you to do all this work, and where they fair with their pricing?
Select to expand quoteMAGNESIUM said..
Hi thanks for your indepth posts.'
where abouts did they allow you to do all this work, and where they fair with their pricing?
This was at Shell Point Marina, 17-21 Mangrove Lane, Taren Point, Botany Bay. From what I understand this is about the last boat yard in the greater Sydney region, and even beyond, that still let owners work on their boats on the hard stand.
The rates I paid were (ex GST):
Slip, Stand & Launch- Yacht up to 35ft, $850
Hardstand- Cruisers & Yachts up to 32ft, per day, $120
Environmental Levy (per month), $120
Pressure wash (1hour min), $150
Hardstand is charged Mon-Sat, no charge Sunday. No restrictions on hours. You can stay on your boat.
I was told the rates were going up at the start of this year.
The owner-manager is on-site. His name is Will.
I will post more about my experience at the boat yard later, plusses and minuses. No dramas, some challenges, but they let you get on with it with just a few rules.
I had a cav30 now sold. Effectively the same as 28 with a scoop on the back. Water under the toe rails was a constant problem. I was never able to fix it. I tried several ideas, including taking the bolts out and using bitumen tape to re-bed them. I think the only solution is to lift them entirely, re-seal the deck hull gap and re-bed the toe rail. Its a big job.
The water collected and sat in a sort of 2m section along the toe rail by the cockpit. From there it would leak through into the cabin and sat in the lockers and bilge.
There were a couple of drain holes in the toe rail in this section which i made bigger to help alleviate the problem. I was going to try some sort of polyurethane sealant along the toe rail, and perhaps even epoxy over the bolt holes. I never got round to it and would consider it a bit of a band aid solution, although it may last a few years.
From memory it also leaked down the mast. When we had the rigging done i believe we had the deck / mast re-sealed.
Ed
@Jormungadr, thanks for sharing and I wish you every success with your Cav28. Its a good boat and will sail nicely (especially with the folding prop). Its getting on in years, but you already know that.
Warning - this is a cautionary tale, but I mostly blame myself. (Also, the workmanship of previous owners was incredibly bad, in places)
Please think twice before touching the engine. I decided to try to fix up my Bukh DV10 diesel and it went wrong. Talk about opening cans of worms! I kept a blog. The last episode is about conceding defeat, here theboattinkerer.blogspot.com/2022/08/ .
Hindsight is easy, but if I could send a message back to my earlier self I would advise the following
* Keep the engine but replace all the hoses. You can salvage many of the spurs from the old rubber hoses by cutting off the crimping with a wire-cutter, which saves the agony of trying to find replacements
* Check the mounts - one of my mounts had snapped and the engine was actually sitting on the starter motor. I could have got it welded and refitted, whilst sorting through most of the other stuff that needed to be fixed
* Don't open up the engine beds unless you are prepared to do a major rebuild in the engine bay. My beds were stepped, not aligned, and the builders had packed out the underside of the GRP casing with scrap timber. They had also extended the steps by screwing timber blocks to the front of the steps. The engine beds became a horror-show.
* Don't attempt to refurbish a Bukh engine, unless you have all the tools, know-how, and spares. The replacement elbow was about $650 from memory, and was almost impossible to find. Refurbishing the Bukh might not be cheaper than a new engine, but a new engine might need surgery on the engine beds (see above).
* Use a stuffing box instead of a Volvo dripless seal. This might be contentious on this forum as different folks have different opinions. The trouble with the dripless seal was that, when I got the engine out (with the boat in the water), the shaft was unsupported, so the seal became unseated and nearly sank the boat. The water in the boat ruined the cabling, which was already in a bad condition with ends twisted together and covered with insulation tape.
* If you have the time and will-power, re-route the wiring to above the water-line. If your wiring was as bad as mine, this means a complete re-wire, but you can do it incrementally, as you have time.
I sympathise with you about the windows. Mine were screwed into the cabin top with the strangest assortment of screws and "sealed" with silicone (which doesn't do what you think it should do). I fixed mine more securely by getting them out, cleaning them and through-bolting them, using the ring-plates on the inside as an anchor (with nylon washers and tef-gel to stop or slow down galvanic corrosion). I'm not saying this was a good repair, but it did something to stop the leaks. Heaven knows what the leaks did to the balsa core.
Select to expand quoteCav30 said..
I had a cav30 now sold. Effectively the same as 28 with a scoop on the back. Water under the toe rails was a constant problem. I was never able to fix it. I tried several ideas, including taking the bolts out and using bitumen tape to re-bed them. I think the only solution is to lift them entirely, re-seal the deck hull gap and re-bed the toe rail. Its a big job.
The water collected and sat in a sort of 2m section along the toe rail by the cockpit. From there it would leak through into the cabin and sat in the lockers and bilge.
There were a couple of drain holes in the toe rail in this section which i made bigger to help alleviate the problem. I was going to try some sort of polyurethane sealant along the toe rail, and perhaps even epoxy over the bolt holes. I never got round to it and would consider it a bit of a band aid solution, although it may last a few years.
From memory it also leaked down the mast. When we had the rigging done i believe we had the deck / mast re-sealed.
Ed
Yes, this is annoying how the water pools against the toe rail on the side decks next to the cockpit and just sits there. I'll do a post about what I did with my toe rails.