I knew about these when I bought the boat but it's now time to fix them as they are absolutely the only defects I can find in the whole boat which is otherwise amazing. There are little rain gutters extending diagonally outboard and forward from the front corners of the front hatch and the hatch itself is on a significant slope with no frame or bezel.
I'm told that this is a common fault with these boats as the fore deck is quite lightly built and also flexible which can be felt when standing on it. Of course trailers trailers are built very light in all respects.
My plan was to rip the carpet back a bit above the v berth and add a little glass in these areas. I think the foredeck is a foam sandwich but at these gutters it just thins out to mere single skin fibreglass.
I was thinking of putting a band of say 120 mm wide fibreglass right across from gunwale to gunwale as the boat is not very wide at this point. There is however carpet glue all over the place and getting that much glue off will make an unholy mess so now I'm thinking of doing maybe 100 by 120 patch under each crack. I would perhaps normally use a couple of layers of biaxial as I'm not sure of the exact direction the stresses run.
The thought occurs however that perhaps I should be using carbon fibre to keep things light and perhaps stronger.
I have never worked with carbon fibre before so I'm wondering if anyone has any suggestions. Presumably there is an equivalent to biaxial cloth? Would it perhaps not be a good idea in an area which flexes due to carbon fibre perhaps being more brittle?
Advice please.


Congrats on your new purchase you must be very pleased and looking fwd to the trip. Photo 13 here australyachts.com/#clubman8 shows the fore cabin view of the 3 channels.
The internal 100x120 patch on each could work - how long are those channels and what is their maximum width and depth? Unfortunate that the cracking has been left to propagate past their fwd end into the deck proper.
To do it right it would appear that the on top of the deck cracks need to be carefully gouged out with a suitable fine hand tool or 1mm drill bit, acetone cleaned and epoxy glue filled. Sand and apply neat biax or triax cloth layer/s with epoxy resin in the channel from above, going out say 20mm laterally beyond the edges and extending say 40mm forward beyond the existing crack ends. Sand and fair, 2 pack poly paint to finish off. 2 colours needed - Inspirations Paints will tint Northane to the deck colour.
Then apply the 2 layers of biax or triax with epoxy resin under the deck - say a circular patch of diameter the length of the channels and crack extent plus 50mm. Getting the carpet and glue off a necessary pain as you say. If (as expected) the cracks are all the way through to underneath then gouge out and epoxy glue fill them also before applying the glass laminates.
Good biax and triax supplier here but the small quantities you need might be difficult to get.
www.colan.com.au/compositereinforcement/stitched/triaxial.html
Would not use carbon fibre double bias - see the Colan website for it - as you allude to this laminate will be a lot different to the probable E or S glass of the original laminate. The main difference being stiffness - so the carbon fibre patch will create a stiffness mis-match to the original laminate and the original laminate won't take it's share of the membrane and bending stresses. Stiffness being the initial slope of the material stress-strain curve. Brittleness is the amount of elongation to final fracture - lower elongation means higher brittleness - and carbon fibre will be more brittle than E and S glass as you say. But the stiffness mis-match is the issue.
The last person who posted at the below link in 2020 might have some comments?
www.seabreeze.com.au/forums/Sailing/General/Austral-Clubman-8--leaks-in-keel-box?page=1
Select to expand quoter13 said..
Congrats on your new purchase you must be very pleased and looking fwd to the trip. Photo 13 here australyachts.com/#clubman8 shows the fore cabin view of the 3 channels.
The internal 100x120 patch on each could work - how long are those channels and what is their maximum width and depth? Unfortunate that the cracking has been left to propagate past their fwd end into the deck proper.
To do it right it would appear that the on top of the deck cracks need to be carefully gouged out with a suitable fine hand tool or 1mm drill bit, acetone cleaned and epoxy glue filled. Sand and apply neat biax or triax cloth layer/s with epoxy resin in the channel from above, going out say 20mm laterally beyond the edges and extending say 40mm forward beyond the existing crack ends. Sand and fair, 2 pack poly paint to finish off. 2 colours needed - Inspirations Paints will tint Northane to the deck colour.
Then apply the 2 layers of biax or triax with epoxy resin under the deck - say a circular patch of diameter the length of the channels and crack extent plus 50mm. Getting the carpet and glue off a necessary pain as you say. If (as expected) the cracks are all the way through to underneath then gouge out and epoxy glue fill them also before applying the glass laminates.
Good biax and triax supplier here but the small quantities you need might be difficult to get.
www.colan.com.au/compositereinforcement/stitched/triaxial.html
Would not use carbon fibre double bias - see the Colan website for it - as you allude to this laminate will be a lot different to the probable E or S glass of the original laminate. The main difference being stiffness - so the carbon fibre patch will create a stiffness mis-match to the original laminate and the original laminate won't take it's share of the membrane and bending stresses. Stiffness being the initial slope of the material stress-strain curve. Brittleness is the amount of elongation to final fracture - lower elongation means higher brittleness - and carbon fibre will be more brittle than E and S glass as you say. But the stiffness mis-match is the issue.
The last person who posted at the below link in 2020 might have some comments?
www.seabreeze.com.au/forums/Sailing/General/Austral-Clubman-8--leaks-in-keel-box?page=1
Thanks very much for that comprehensive answer r13.
Yes unfortunately something will have to be done about the top as well as otherwise I will end up with water in the core but I'm thinking that may be a job for when I get back as it needs to be very good aesthetically. I might just put some unsightly Sika or something over it temporarily but fix the underside now with a couple of layers of biaxial to stop the cracks going any further. Think I have some biax or triax left over somewhere.
Thanks for the advice to stick with normal glass and make it circular. Might try some white spirit on the glue tomorrow then a bit of hand sanding to avoid a hell of mess. Thankfully the carpet peeled back on one piece.
Meanwhile making up a bow roller to hold the 12 kg Manson Supreme I found on Facebook marketplace. It's kind of difficult to sort out but getting there. See pic. Y-shaped affair bolting to toe rail to facilitate keeping the hank on sails, forestay fitting and bow fitting unaltered. 10 m of 8 millimetre long link and 50m of 14mm nylon complete the pic rather than the lunch/racing anchor and no chain it came with. A guy who I met down there who is 74 with a Clubman tells of his anchor letting go in Refuge bay off Wilsons prom one night and waking up out at sea not knowning where he was.
Ditched plans for changing the rather nice built in ice boxes into a eutectic fridge on the grounds of complexity and lack of time and bought a portable fridge from RTM today along with some plastic steps from Bunnings which take up very little extra room although mean dicing the very nice high gloss companionway steps and relocating a fire extinguisher plus slightly restricted access to double quarter berth. Hopefully I'll get there by the end of the month.
Won't be the boats first time as it wears a Hamilton Island race week plaque.


You sure, just ignore them
looks like just gel coat cracks and not into the lay up so no water ingress
Select to expand quotelydia said..
You sure, just ignore them
looks like just gel coat cracks and not into the lay up so no water ingress
If rather be safe than sorry.
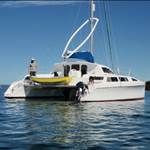
That's a nice looking interior and roomy for a TS..
With my old Icebox, I cut a hole in the front, then built a shelf. Fitted my 40 ltr Waeco Fridge/Freezer, in sideways, with tiedown straps on handles.. Then I built a hinged top for access and this serves as a map table.. Also have room for storage underneath.
I don't know how large your icebox is and whether you are prepared to cut a hole in it..? Lol
Although with Icebox's, having to deal with the pain of replacing ice, it was an easy decision..
Keep up with the good Work..
Cheers
Select to expand quoteBeamReach said..
That's a nice looking interior and roomy for a TS..
With my old Icebox, I cut a hole in the front, then built a shelf. Fitted my 40 ltr Waeco Fridge/Freezer, in sideways, with tiedown straps on handles.. Then I built a hinged top for access and this serves as a map table.. Also have room for storage underneath.
I don't know how large your icebox is and whether you are prepared to cut a hole in it..? Lol
Although with Icebox's, having to deal with the pain of replacing ice, it was an easy decision..
Keep up with the good Work..
Cheers
Yes thanks it's still readily doable in the future but I'm really pressed for time now. The fridge freezer was only $319 for 45 litres at RTM on sale and chosen for its dimensions as a step and least obstruction to quarter berth access .
Tuesday I have to spend the whole day in Emu Plains (far from me so hope shopping centre is interesting) getting the car chipped and tuned because it's simply wasn't up to the task of towing despite its 3000kg supposed towing capacity.
Picked up a Bimini today but need to buy some aluminium angle so it can bolt to toe rail and avoid more deck penetrations.
Just went to the other boat to canibalize a bit of gear and tools.
Def no time for additional projects because want to launch, retrieve and sail it at least once before I go :). Been no wind for a week now but you can better when I'm ready to do that it will be blowing a gale.
As for the cracks, just get out the dremmel and if it doesn't go into the glass, then all good, fill up with flowcoat and polish back. If it is into the glass I would be really wary of getting stuck into the deck with glassing. I would much rather pop some resin into any defect, then flowcoat, and go underneath and stop the whole thing from flexing much ever again
I would go underneath and add a little beam. Increasing the depth of a beam by 2 increases the stiffness by 8 times. So I would look at making a small beam from side to side, maybe about 5 times the deck thickness - so probably about 30-40 mm. Round it over, and it will be nice, low profile and increase the stiffness a lot, and reduce any cracking in the gel coat in the deck. You could make a feature out of timber and glue it on, sticking it through the carpet when finished. Or do something in composite, double bias wrapped over a layer or two of light uni on the top of the beam. The stiffer you make the beam, the better in my view. Decks and hulls do not gain from being spongy, microcracking takes place in heavily stressed laminates, (which is why Lasers go soft). so it is always best to avoid flex if possible to improve the longevity of the laminate.
Select to expand quoteKankama said..
As for the cracks, just get out the dremmel and if it doesn't go into the glass, then all good, fill up with flowcoat and polish back. If it is into the glass I would be really wary of getting stuck into the deck with glassing. I would much rather pop some resin into any defect, then flowcoat, and go underneath and stop the whole thing from flexing much ever again
I would go underneath and add a little beam. Increasing the depth of a beam by 2 increases the stiffness by 8 times. So I would look at making a small beam from side to side, maybe about 5 times the deck thickness - so probably about 30-40 mm. Round it over, and it will be nice, low profile and increase the stiffness a lot, and reduce any cracking in the gel coat in the deck. You could make a feature out of timber and glue it on, sticking it through the carpet when finished. Or do something in composite, double bias wrapped over a layer or two of light uni on the top of the beam. The stiffer you make the beam, the better in my view. Decks and hulls do not gain from being spongy, microcracking takes place in heavily stressed laminates, (which is why Lasers go soft). so it is always best to avoid flex if possible to improve the longevity of the laminate.
I'm liking that idea. I was lying on the V berth today looking up through the fibreglass and I think the crack goes pretty much all the way through. It might even be through foam core as when backlit it pretty much looks like honeycomb all round the crack which obviously isn't balsa or fibreglass. The good news of course is that it is pretty sloped at that position so water would run off and in any event the boat has spent most of it's life in a shed. In those circumstances foam is probably reasonably slow to succumb to rot. The light still passing through and maintaining a honeycomb appearance near and far from the cracks seems to imply no rot.
Internal reinforcing beam coming up.
Well that was a bugger of a job and it's not even installed yet. Getting the glue off was the worst part.
Laminated beam of 6 layers held together with Megapoxy already to be Megapoxied to the underside of the deck tonight so that the 24-hour dry time is only half over when I glass over it tomorrow morning.
Only one decision left and that is whether to epoxy the edges to the flange on the hull or just stop the epoxy before the hull/deck join.
Just put a layer of Sika 291 over the cracks in the deck for the time being to stop water ingress. Actually doesn't look all that bad. Can't wait to walk on it and see how solid it feels. Hopefully I don't just create another hard spot for it to crack along.