Skiwi build

> 10 years ago
Reply
Register to post, see what you've read, and subscribe to topics.
tryhard
tryhard
222 posts
222 posts
17 Dec 2014 6:15am
Thanks Clem.The last question was directed at Hiko's post not yours. Do you have any comment about the linkage issue?I wondered whether your set up provided some stability because it was fixed though flexible at the plastic joints.My present set up allows the front wheel to flop without hindrance
Clemco
Clemco
430 posts
430 posts
17 Dec 2014 7:11am
The Nolathane joints do tend to self center the steering. As long as the ball joints are stainless steel they will be ok. To stop the wheel over steering you can weld on a couple of lugs on to the sides of the steering head to stop it at a certain angle, as picture below. To stop it floping over you can tighten the bolt on the steering pin.


Hiko
Hiko
1229 posts
1229 posts
17 Dec 2014 9:23am


Hi Tryhard follow Clems advice and you will be fine Here is one of those beach chairs that he spoke of
The back could be laid back more and the whole thing lower for your purpose
Note there is no cross brace at the back that was mentioned earlier
Great to see the rapid progress you are making
Keep those pictures coming I am sure there are many who are interested
Clemco
Clemco
430 posts
430 posts
17 Dec 2014 10:02am
Just had a look at my mini yacht. To get that weight right at the front wheel you can shorten that 6x1 plank to fit between the rear wheels and move it back and forward so you can experiment with your seating position.
Clemco
Clemco
430 posts
430 posts
17 Dec 2014 11:09am
Just another thought...When you put the bathroom scales under the front wheel level up the yacht by putting similar height blocks under the rear wheels.
Test pilot 1
Test pilot 1
WA
1430 posts
WA, 1430 posts
17 Dec 2014 11:18am
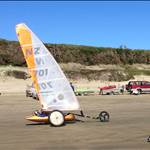
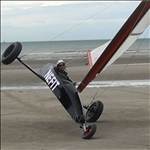
I can almost hear you ask why is the weight on the front wheel so important
You need more weight on the front wheel for steering/cornering but then you need less for straight running. So to accomplish this you need to find that sweet point between those two requirements and that is what you are determining with your seating position(the dark art). Getting the weight on the front wheel is accomplished by moving your body for/backward, and sideways to some extent, so you don't want to lock your body in one place. You basically "trim" your yacht with your body weight.
Tightening the steering linkages helps to give you more control so that you are not constantly adjusting your steering but rather make it almost "set and forget"
tryhard
tryhard
222 posts
222 posts
17 Dec 2014 12:48pm
All advice at this juncture gratefully received. Clem- a question.In a previous post on this page you suggested that the seating position should be fixed by a plank sitting on the axles with the back edge touching the tyres.Are you now saying the seating position can be forward or back from this point?
Clemco
Clemco
430 posts
430 posts
17 Dec 2014 1:09pm
Yes I realized it could be slighty back from that position after having another look at my mini seat position. As you found out it depends on how far you want to lay back. I find with these little yachts you don't want it too light on the front end as they can get quite twitchy at high speed. I would aim for around 15kg at the front wheel in your case.
tryhard
tryhard
222 posts
222 posts
17 Dec 2014 1:10pm
I have already bought a crash helmet
tryhard
tryhard
222 posts
222 posts
17 Dec 2014 5:18pm
Following the instructions I put the bathroom scales under the front wheel and moved the plank back and forth until I got the balance between comfortable leg room and the target weight on the front wheel.This position was about 100 mm aft of the front edge of the wheel.I am now experimenting with the seat set up. I plan to use these curved sections and make a seat /back out of pvc


tryhard
tryhard
222 posts
222 posts
19 Dec 2014 4:08am
I have decided to make a back for the seat.I toyed with the idea of using the leftover boom parts but opted instead for a curved back made from ply.This was left over from the deck skirt.As can be seen,


the construction is simple-the two halves of the ply were clamped together against a seat back to give it the correct shape.I wondered whether my wife might have a recurrence of PTSD from my last boat building project inside our house but she was fine.Must be the Christmas spirit.We no longer own a sewing machine so my kindly neighbour has agreed to stick up the PVC back for the seat.The idea is to sew sleeves either side and these will slide over the poles.We shall see if this works.If it doesn't we can try something else.The newspaper on the floor was to catch the glue drips
tryhard
tryhard
222 posts
222 posts
19 Dec 2014 4:11am
I meant stitch up not stick up.I must learn how to edit
Hiko
Hiko
1229 posts
1229 posts
19 Dec 2014 8:45am
Looking good !!
Test pilot 1
Test pilot 1
WA
1430 posts
WA, 1430 posts
19 Dec 2014 2:10pm
tryhard said..
I have already bought a crash helmet


And I hope, a seat belt
tryhard
tryhard
222 posts
222 posts
19 Dec 2014 4:37pm
My engineer mate welded on these bits to the steering head which for want of a better term are flop stops.The question is : does this allow for sufficient turning ability (does the ability to turn need to be tighter than this?)


SJK
SJK
43 posts
SJK SJK
43 posts
19 Dec 2014 4:59pm
You can't really see that from a picture, you should try it out. If it isn't too hard for your legs to push the wheel back to the center once you reach one of the sides, then it is fine. If it cost too much force, then you should make the turning ability a bit less. On the other hand, if you can turn easily now, but the turning circle is too wide, you can try to widen the freedom of turning of the wheel a bit.
For what I found out, it is just a bit of trial and error.
Test pilot 1
Test pilot 1
WA
1430 posts
WA, 1430 posts
19 Dec 2014 8:45pm
SJK said..
You can't really see that from a picture, you should try it out. If it isn't too hard for your legs to push the wheel back to the center once you reach one of the sides, then it is fine. If it cost too much force, then you should make the turning ability a bit less. On the other hand, if you can turn easily now, but the turning circle is too wide, you can try to widen the freedom of turning of the wheel a bit.
For what I found out, it is just a bit of trial and error.


And hopefully we all learn from our errors
Clemco
Clemco
430 posts
430 posts
20 Dec 2014 5:29am
Yes that looks like you have heaps of turning ability. Grind off those sharp edges and corners.
One thing I enjoy watching newbies building for the first time is seeing them come up with totally new ways of doing things.
Liked the way the forks are attached to the U bracket. Very tidy, (hope there is another weld on the inside of the U bracket though).
Looking forward to how the sling seat will turn out.
Don't forget the fiberglass mast will need some strengthening at the base. Usually done with a length of timber dowel, or another length of glass mast.
Clemco
Clemco
430 posts
430 posts
20 Dec 2014 12:33pm
Just spotted a possible weakness in your ski setup. Not good to have the screw holes from the boot fasteners at that point. In fact probably the worst place possible. May need to have another look at that sometime.


tryhard
tryhard
222 posts
222 posts
20 Dec 2014 1:31pm
Should I add another ski? I'm thinking all skis will have boot fastening holes
tryhard
tryhard
222 posts
222 posts
20 Dec 2014 1:36pm
Today I painted the metal bits.I constructed a sort of spray booth using a drop cloth and suspended the smaller bits on strings


tryhard
tryhard
222 posts
222 posts
20 Dec 2014 1:39pm
My very kindly neighbour produced the first shot of the seat but this was too loose so back to the sewing machine she went,In the meantime I tried out the back support for size


tryhard
tryhard
222 posts
222 posts
20 Dec 2014 1:41pm
My boatbuilder mate pot riveted the aluminium section to the boom part.Since I plan the use a sleeve set up for the PVC seat I drilled out the rivets so I can slide the sleeve over the poles
tryhard
tryhard
222 posts
222 posts
20 Dec 2014 2:59pm
I'm wondering about the screw hole issue.Presumably there is a danger of failure. Would bogging the holes with epoxy help? I assume that this issue doesn't arise when using the skis for what they were designed for.

Hiko
Hiko
1229 posts
1229 posts
20 Dec 2014 4:14pm


I had a failure of one of my Ski axles on a mini because the binding screw holes were right where the ski axle met the chassis mount
The worst place to have them
I posted photos on the forum relating to it No problem if the screw holes are kept away from that high stress area
I doubt that filling the holes will help much as the integrity of the ski has been compromised
Might be Ok if you laid some glass cloth and resin as well over that area
tryhard
tryhard
222 posts
222 posts
20 Dec 2014 5:35pm
What about adding another ski?
Hiko
Hiko
1229 posts
1229 posts
20 Dec 2014 6:10pm
I imagine three skis would be very stiff
You might be ok if you turn the bottom ski over so the holes are in compression instead of tension
Skis are readily available at good prices if you hook into a good source I have actually picked up skis that have never been used and
hadn't even had bindings screwed into them so had no holes Skiers must change their skis like their socks
There is a guy near here that has a fence made out of them !
wokelliott
wokelliott
WA
179 posts
WA, 179 posts
20 Dec 2014 10:21pm
Hi Trihard. Filling the bolt holes with bog will not help at all. Bolt holes in anything is the next best thing to sawcuts!! Glassing over the holes area will help if you use many layers of woven mat and epoxy resin on the underside, taper off the thickness over 300mm as you lay away from the holes. It is absolutely necessary to thoroughly roughen the ski surface material before glassing. (Test the adhesion to the ski material first on a piece of offcut after it has cured a few days). Another little weak point is having the seat backrest behind the support arms. Screw the backrest to the front of the arms. Great lot of photos you are posting with many onlookers. Well done...Wok
tryhard
tryhard
222 posts
222 posts
21 Dec 2014 5:27am
Thanks for the advice chaps.This is the power of a forum.I'm not planning to use the ply as a backrest rather a cross member to provide lateral support,The reason it is curved is so that my back (hopefully) doesn't come into contact with it.The idea is that the PVC provides support.The curved section has given me an idea for another build which is to make lots of them and pot rivet them along the curved sections to make a big banana to sit/lie in.Dreams dreams....
tryhard
tryhard
222 posts
222 posts
21 Dec 2014 1:19pm
This so nice with its new paint job I might just keep it in my backyard so it doesn't get dirty


Please Register, or first...
Topics Subscribe Reply

Return To Classic site 😭
Or... let us know if a problem, so we can tweak! 😅